Warhammer 40,000 Campaign Outline
The Battle of Jarkanium
The Jarkanium Empire: Once a home to a thriving outpost of Imperial loyalists, the native inhabitants were wiped out four thousand years ago by an invading Tyranid army. The Tyranids never had time to establish a hive on the wreckage of Jarkanium for they left shortly after their crushing victory. Recent expeditions have revealed that the world may be a beacon for Necrons or perhaps have once housed the fearsome undead and somewhere they still reside.
In the meantime the planet is strategically vital for the larger conflict in the Ork/Imperium struggle in the neighboring Gurkkin system where the Space Marines fighting there need a planet close enough to serve as a supply depot which won't be subjected to the massive conflict. Jarkania is just such a location but recent reports suggest that the Orks may have contacted a Chaos faction and arranged to make the Space Marine's task on Jarkania far more difficult...
Campaign Tree
Each mission in the tree represents part of the path the campaign takes. The progression from the first mission to the final conflict, Mission 0501-FN017: I Left My Heart in Jarkanium is variable, but progresses in four primary chapters plus a prologue and the final battle/climax. In most cases each chapter has a Draw Mission which should be played in the event of a tie during one of the Chapter Missions; if more than one Draw occurs in the same Chapter, unused Draw Mission from previous chapters may be used or the chapter's Draw Mission may be played more than once with different terrain layouts. A maximum of 14 missions may be played in this campaign, with 10 or 11 being typical. In addition to each army, there is a chance that either Orks or Necrons may appear in any mission at the midpoint of turn two. See the Third Party joining rules below for more details. Orks and Necrons act merely as spoilers in each mission. Should they prove victorious, one of the three draw missions is played next, but Orks and Necrons do not receive campaign bonuses.
All missions provide campaign bonuses. Campaign bonuses come in two forms: Mission bonuses and Final Conflict Bonuses. Mission bonuses are available in the next mission after the bonus is earned. Mission bonuses can be used, but are not required and expire after the next mission. They cannot be saved and used in later missions. Mission bonuses also do not apply in the Final Conflict. Final Conflict bonuses are cumulative and can only be used during the Final Conflict.
Third Party Joining
The Space Marines are fighting in an adjacent system with a massive force of Orks. Occasionally a small force of Orks may happen by Jarkania during a retreat or meneuver and pick up the Space Marine's signatures on their scanners and stop to cause them some trouble. Also, Jarkania is home to many hibernating Necrons who occasionally surface when awakened by fighting on the surface.
Whenever Orks or Necrons join the fray they do so in the middle of turn two. The Ork or Necron forces always have 75% points values of the highest point value force in the mission. So if the mission is 1,000 points for both Chaos and the Space Marines, a joining Ork landing party will be 750 points strong.
Turn Two
Between the first player and second player's turn, the spoiling army will deploy one half of their units (round down) using standard Deep Strike rules. The third party player then plays second between the other two armies. On their turn three, the player may roll Reserves to bring the rest of his/her forces into play. If the Reserves roll is not met, the third party player may deploy the rest of their forces in turn four without making a Reserves roll using standard Deep Strike rules.
Note that the Orks will not want their alliance with the Chaos Space Marines known and will attack/fight them to maintain this charade (at the behest of the Chaos Lords) with equal ferocity as they will the regular Space Marines.
Campaign Rules
- Each player must field a force according to the mission parameters including Force Organization and points values. Some missions will require one force to be outnumbered or have inequal points values.
- Unless otherwise noted, models who are wounded and counted as casualties are considered to be mending at the army encampment for the next mission. This includes independent characters and individual unit models. Units which are counted as casualties for victory point purposes due to falling back or deep striking off the table are considered unwounded for purposes of the next mission, however.
- Units which are granted a mission reward should be noted before the next mission begins but are not required to be indicated as much to the other player before the game.
- Units which are falling back or removed from the table due to falling back past the table edge in the previous mission may not be granted mission rewards in the next mission. This includes units which contain models from cowardly units in the previous mission. Example: Space Marines 17th Company is attacked by a Havoc squad and more than 50% of their numbers are wounded. They fail their leadership roll and are falling back. By the end of the mission only one model from 17th Company remains. Despite 17th Company's failure, the mission is a success for the Space Marines. In the next mission, the remaining model from 17th Company is added to the Fighting 32nd Company, but because of the 17th Company model, the Fighting 32nd are not eligible to receive a mission reward.
- At any time a player may declare a fighting withdrawl. This means they forfeit the mission but they try to escape the battle with as many units intact as possible. The strategic reason for this is typically to avoid a rout in a high point value mission if the next mission is likely to also be high point valued and the player fears not being able to field a complete force considering the recovery rules (above). Note that if a player cannot fill the points value for a mission due to recovering models, they must field as much of an army as they can anyway, they do not get a reprieve from the recovery rules.
- A fighting withdrawl may be declared at any time, but no action is taken until the beginning of the player's next full turn. At the beginning of the withdrawl turn, all units capable of movement (including units falling back, although they are considered to be falling back for the remainer of the mission) move 6" toward the nearest table edge. Specific units may attempt to ignore the withdrawl order by passing a Leadership test with the usual modifiers and an additional -1. Once the initial sprint from the battle is complete, units may make their normal moves except that units embarked in a vehicle may not disembark and units locked in combat at the beginning of the turn are subject to an immediate Sweeping Advance from assaulting foes. If all units are off the table or have at least one model within 6" of the table edge, the army is considered to have successfully retreated and the mission ends. Otherwise, the normal Shooting Phase takes place and the opponent has a chance to cut off their escape. Units in a fighting withdrawl may not charge. Each subsequent turn in a fighting withdrawl is treated exactly the same with the initial 6" sprint and so on until the game is over.
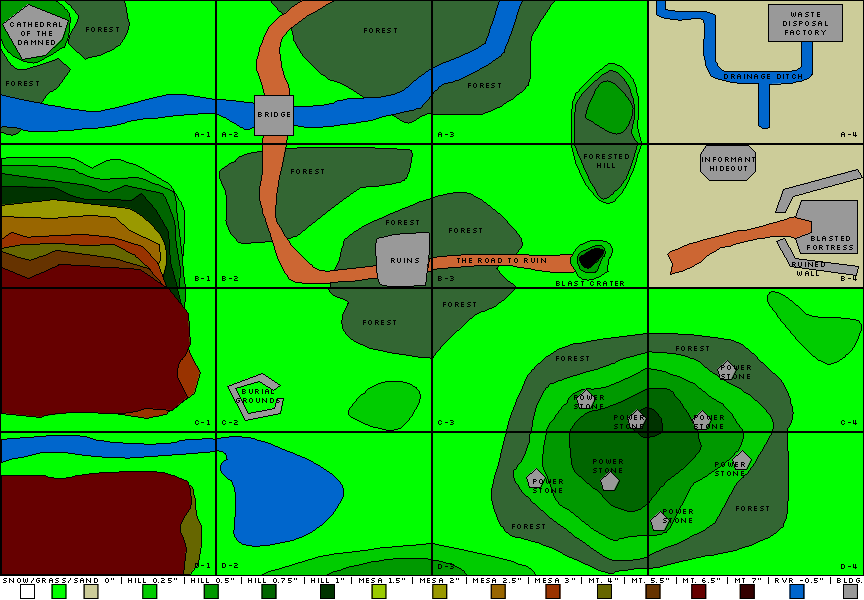
Terrain Boards
The image below shows the full compliment of terrain boards for this campaign. The mission details will describe which configuration and board numbers are used for that mission. Colors on the map do not necessarily reflect board coloration, rather they are used to denote elevation, described in the legend just below the map.
Missions
Mission Map

Prologue – 0501-ST001: Finders Keepers
A knowledgable source has revealed that an ancient Jarkanium temple houses a valuable artifact. The mission is to retrieve the artifact and return it safely to the encampment.
Mission Details
- Points Value: 800 Points (Both)
- Game Type: Alpha Capture and Hold (Ruins)
- Game Length: 6 Turns
- Third Parties: Yes
- Terrain Boards: B-2, B-3, C-2, C-3
The terrain for this mission is heavily wooded areas with an overgrown trail leading to the ruins. Each player deploys on opposite sides of the table (short B or C ends). Note: The ruins are too deeply nested in the overgrowth of the planet's surface and therefore vehicles are not premitted in this mission. Steeds are okay. Each player's deployment edge counts as their "Entry Point." An opposing player may secure their enemy's Entry Point by placing any unit within 2" of the Entry Point edge. This is only useful in the case of a Draw (see below).
The player with the most scoring units within 8" of the Loot Token (artifact) wins the mission. If there are no scoring units within 8" of the Loot Token the game is a Draw, play Mission 0501-DW014: A Hand in the Ambush. If the players have an equal number of scoring units within range, the player with the most models in range wins the mission. If the draw cannot be broken that way, the player who has secured his opponent's Entry Point wins. If the Draw still cannot be broken, the mission is declared a Draw and the next mission played will be Mission 0501-DW013: A Hand in the Ambush.
Rewards
- Mission Reward: Teleportation Device — One unit may be given the Infiltrate ability without cost (units which are expressly prohibited in the Codex from using Infiltrate may not be granted this ability) during the next mission.
- Campaign Reward: Improved Teleportation Device — All HQ units may use Infiltrate without points cost and one additional Troops or Elite unit may be given player's choice of Deep Strike or Infiltrate without cost.
Results
If the Space Marines win, go to Mission 0501-SM002: A Bridge Too High. If the Chaos Space Marines win, got to Mission 0501-CM008: Babies? The Ork Brings 'Em.
Chapter 1 – 0501-SM002: A Bridge Too High
The Space Marines have been told by a reliable source that a second artifact, this one related to but more modern and more powerful than the first, is located across a large chasm from the Space Marine's position. As a small retrieval force of Space Marines approach the chasm they are intercepted by the Chaos forces who somehow knew they would be there.
Mission Details
- Points Value: 350 Points (SM); 400 Points (CSM)
- Game Type: Gamma Secure and Control
- Game Length: 4 Turns
- Third Parties: No
- Terrain Boards: C-1 and D-1
- Force Organization: No Heavy Support units allowed.
This is a small board, and a quick mission. The primary Loot Token will be placed across the chasm from whichever edge the Space Marine player deploys to (Space Marines always deploy first in this mission). There should be a single rickety bridge leading across the chasm wide enough to accomodate a troops unit single file. If a Biker, Steed mounted model or more than four models cross the bridge a dangerous terrain check must be made. Failing the dangerous terrain check will destroy the bridge and any units currently on or crossing the bridge (no saving throws allowed).
Chaos Marine forces will deploy on an edge 90 degrees from the Space Marine deployment edge with half of their forces on either side of the chasm.
The Space Marines win the mission if they have a scoring unit on the side of the chasm with the Loot Token at the end of turn four and have more Victory Points than the Chaos Marines. Note that if the Space Marines have enough Victory Points, even for a Devastating Slaughter! victory but no scoring unit on the Loot Token side of the chasm, the best they can hope for is a Draw. The Chaos Marines win via standard Victory Points calculations (including scoring units in proximity to the Loot Token).
In the case of a Draw, the next mission is Mission 0501-DW014: A Hand in the Ambush.
Rewards
- Mission Reward: Guidance System — The artifact is a teleportation guidance system. During the next mission any rolls for Reserves Troops get +1.
- Campaign Reward: Guidance System and Pinpoint Drop – The artifact is a teleportation guidance system; any Deep Striking units do not scatter. Guidance System as above.
Results
If the Space Marines win, go on to Mission 0501-SM003: Double Mystery, Hold the Pickles. If the Chaos Marines win, go to Mission 0501-CM008: Babies? The Ork Brings 'Em, unless Chaos has already completed that mission in which case move to Mission 0501-CM009: A River Runs Through Them.
Chapter 1 – Mission 0501-SM003: Double Mystery, Hold the Pickles
The Space Marine's local informant has suggested that the rock formations on top of a hill near the Space Marine encampment are actually some sort of power source (possibly of Necron design). These power conduits could provide enough power to handle a supply depot without much problem if they could be appropriately tapped. Unfortunately the Unhallowed Horde are once again apparently privvy to the same intel as the Space Marines...
Mission Details
- Points Value: 1,200 Points (Both)
- Game Type: Omega Take and Hold
- Game Length: Variable
- Third Parties: Yes
- Terrain Boards: C-3, C-4, D-3 and D-4
- Special Rules: Infiltrate is not permitted in this mission. Deep Striking is permitted but the blast marker may not be placed within 12" of any power conduit (the conduit/stone energy fields react badly with teleportation controls, drop ship navigation and Warp rifts).
The hill with the power conduits is located at the center of the table. Each player deploys from one of the short ends. The six power conduits/stones should be placed on a large hill roughly 10" from each other. Scoring units must be within 4" of a power conduit/stone in order to count as controlling the stone. No one unit may control more than one stone. If a unit spills over into another scoring zone, the unit counts as controlling the zone in which the most models are located. Once a power conduit has been controlled for one turn, one model from the unit may stay behind to guard the unit and the unit may proceed to capture more conduits. Models left behind in this way are not counted as casualties but may not act as independent characters, may not fire during the Shooting Phase and may not rejoin the unit at a later time. They may defend themselves in an assault. They must maintain base contact with the conduit at all times and may only be moved around the conduit/stone 6" at a time to prevent line of sight from enemy forces.
The player with the most conduits at the end of the game under his control (either by full units or by guarding models) wins, regardless of other Victory Point conditions. However, if the player who wins the mission does not succeed in securing enough Victory Points to count the mission as a regular win, they do not receive the Mission Reward, only the Campaign Reward.
If an equal number of conduit/stones are controlled at the end of the mission, Victory Points determine the winner. If the match is a Draw in terms of Victory Points and the number of conduits controlled are equal, the next mission is 0501-DW014: A Hand in the Ambush.
Rewards
- Mission Reward: I Have the Power – All Power Weapons are +1 to Strength (in addition to any normal bonuses).
- Campaign Reward: All Your Base and I Have the Power – A powered base means Reserve troops arrive faster. Reserves may arrive on Turn 1 with a roll of 6. Power Weapons are +1 to Strength (plus normal bonuses).
Results
Regardless of which team wins, go to Mission 0501-CV004: I Smell a Rat.
Chapter 1 – Mission 0501-CM008: Babies? The Ork Brings 'Em
A reliable source indicates that somewhere in the barren plains of Jarkanium a natural Warp Gate exists, although its exact whereabouts have been lost to the ages. As the Chaos forces approach the region, a fleet of Space Marines decend to foil the Chaos Marines search.
Mission Details
- Points Value: 1,400 (CSM); 1,650 (SM)
- Game Type: Omega Cleanse (Deep Strike, Dusk & Dawn, Random Game Length)
- Game Length: Variable
- Third Parties: Yes
- Terrain Boards: C-2, C-3, D-2, D-3
- Special Rules: While Victory Points determines the winner of the mission, the area must be thoroughly searched in order to locate the Warp Gate in enough time to be useful in the next Mission. The winning army rolls a D6 for each table quarter controlled (to control a quarter the army must have more scoring units than the opponent in the quarter). A roll of 5+ is needed to receive the Mission Reward. The winning army receives the Campaign Reward regardless.
At the beginning of turn 5, an Ork patrol will crash land in the least occupied table quarter. Ignore this event if an Ork third party player is present.
The Orks may be played by either player, or both, but will consist of a single unit of Ork Boyz and an Ork Dreadnought. The Orks arrive as if Deep Striking, placing a large blast template and rolling its scatter. If the template scatters off the table, re-roll the scatter until it lands on the table. Place a crater or other marker where the blast template lies.
The orks will attack the nearest unit if threatened, but will avoid leaving the quarter in which they crashed, as they wait for rescue. The orks count as a scoring unit for purposes of control at the end of the game.
Rewards
- Mission Reward: Warp Influence – The Warp Gate is found and the controlling player has a strong influence over Warp activity on Jarkania. If the Space Marines have this ability, any Psykers do not suffer a Perils of the Warp attack on a roll of 2 (only 12) and all opponent Daemonic Instability tests are Ld -1. If the Chaos Marines have this ability, they receive a +1 bonus to summoning rolls and Daemonic Instability tests are Ld +1.
- Campaign Reward: Warp Influence and Evil Weapons – Warp Influence acts as listed above. If the Space Marines have Evil Weapons, their opponents can weild no Daemonic Weaponry. If the Chaos Marines have Evil Weapons, they may weild two instead of the usual one per army.
Results
If the Chaos Marines win, go to Mission 0501-CM009: A River Runs Through Them. If the Space Marines win, go to Misison 0501-SM002: A Bridge Too High unless that mission has already been played in which case go to Mission 0501-SM003: Double Mystery, Hold the Pickles.
Chapter 1 – Mission 0501-CM009: A River Runs Through Them
The local informant reveals that the Space Marines have set up camp in a valley near a river. The Chaos Marines move in to cripple the Space Marines' supply line and command depots, but as they arrive the Space Marines have already relocated and are waiting for them.
Mission Details
- Points Value: 1,500 (Both)
- Game Type: Omega Seek and Destroy (Escalation, Dusk & Dawn, Reserves)
- Game Length: 6 Turns
- Third Parties: Yes
- Terrain Boards: A-1, A-2, A-3, B-1, B-2, B-3
- Special Rules: Both armies may include one extra HQ unit in their force organization (up to 3).
The terrain for this misison should be an extension of the center river board from the valley board used in Mission 0501-FN017: I Left My Heart in Jarkanium. The river should run roughly through the center of the 4'x5'+ board with heavily wooded areas surrounding the river and possibly an extensive rock structure. A central road with a bridge bottleneck should feature heavily into the strategic element of the mission.
Rewards
- Mission Reward: Demoralizing Victory – Your opponent makes all Morale Checks during the next mission at Ld -1.
- Campaign Reward: Strategic Familiarity – Having fought in an epic battle once already, this shows insight into the opponent's way of thinking. All Troop units without a dedicated transport get the universal special rule Preferred Enemy and one HQ unit may take the Fearless ability (if they do not already have it) at no additional points cost. Additionally, once during the final mission, I Left My Heart in Jarkanium, the player may choose to ignore a Leadership test (including Morale tests but not including Psychic Tests) and treat it as if it had automatically passed.
The following army-specific rules also apply, depending on which force wins the mission: If the Space Marines win, they may upgrade any/all Dreadnoughts to 'Venerable'. If the Chaos forces win, they may upgrade any one Troop or Elite unit to 'Feel No Pain.'
Results
Regardless of which team wins, go to Mission 0501-CV004: I Smell a Rat.
Chapter 1 – Mission 0501-DW014: A Hand in the Ambush
On a routine sweep of the Jarkanium foothills, a sudden ambush.
Mission Details
- Points Value: 750 (Both)
- Game Type: Omega Seek and Destroy (Concealment, Reserves (Limited), Random Game Length)
- Game Length: Variable
- Third Parties: No
- Terrain Boards: A-3 and B-3
- Special Rules: Before the game, each player rolls 1D6. The player with the higher roll starts the game concealed. Instead of deploying as normal, place a marker for all non-vehicle units. This unit is concealed. Mark on a sheet of paper which unit belongs to which marker. The concealed player always goes first. In addition, 40K in a Flash rules are in effect: No units may have more than 2 Wounds and no 2+ Saves are allowed.
The concealed player is considered the ambushing force and may not deploy any units which cannot be concealed (vehicles). These units may be brought in as reserves later. The other army, which are the abmushed force, must move all units their full movement value during the movement phase until at least one of the abmushing units is no longer concealed or until turn 3, whichever comes first.
The objective of this mission for the ambushed force is to survive at least six turns with one scoring unit intact. The objective of the ambushing force is to prevent any scoring units from surviving.
During this mission, a Double Victory is possible. If either army forces the opponent into a fighting retreat or completely annihilates the opposing forces, a Victorious Slaughter is awarded. See the Rewards section below.
Rewards
- Mission Reward: Eagle Eye – May see 12" through area terrain.
- Campaign Reward: None.
Results
The winning player is considered to have won the mission which previously ended as a draw. All normal conditions for receiving that mission's rewards must be met. If the conditions cannot be met, no additional reward (aside from Eagle Eye (above)) is received. If the tied mission's Mission Reward is applicable, the player who won A Hand in the Ambush may choose to take Eagle Eye or the other Mission Reward, but not both unless the player received the Double Victory for achieving a Victorious Slaughter.
Chapter 2 – Mission 0501-CV004: I Smell a Rat
Both sides conclude that they are either leaking information or sharing the same source. They both converge on their informant to get some answers.
Mission Details
- Points Value: 750 Points (Both)
- Game Type: Race to Capture (See Below)
- Game Length: Variable
- Third Parties: Yes
- Terrain Boards: A-3, A-4, B-3 and B-4
- Special Rules: A marker or generic model should be used to represent the informant character. The informant will begin the mission in a structure roughly 18" from the nearest table edge. Starting at the end of Turn 2, roll a scatter dice and 2D6. Pick the highest numbered die and move the informant model or marker a number of inches on the D6+1 in the direction of the scatter. At the end of subsequent turns, re-roll the 2D6 and treat it as a normal difficult terrain test (no +1 modifier is used on subsequent turns). Re-roll the scatter die only if the informant model is moving toward the player armies or a thrid party army.
- Force organization: No Fast Attack units allowed.
Place the informant marker or model inside the structure on board B-4 marked "Informant Hideout." At the other end, roll to see which edge each player deploys into; this will be either A-3 or B-3. Note that the deployment zones should be from the far corners relative to the informant's structure. Units must be deployed within 14" of the short table edge and 12" from the long table edge in their deployment zone. Deploy Heavy Support, Troops, HQ and the Elites (Fast Attack not allowed).
The primary purpose of the mission is to reach the informant before the opponent and capture him. To capture the informant a player must have at least one model from a unit (which must be in cohesion) within 6" of the informant model through the next half turn. Note that a unit which has captured the informant will make all Leadership/Morale tests at -2 (in addition to other modifications as normal) due to the presence of a very sketchy informant who will break free given the least bit of opportunity. If a unit which has captured the informant fails a Morale or Leadership test, the informant model immediately scatters/runs in a manner similar to its first movement at the end of Turn 2 (scatter die for direction, difficult terrain test +1" to move).
The Mission lasts until one of the following Victory conditions is met:
- If one army can no longer field units to capture the informant, the opposing army wins. Note that a unit does not have to be a typical scoring unit to capture the target, but it must not be falling back (or it must be capable of successfully performing a Leadership Test to regroup).
- If a unit captures the informant and during the opponent's next half turn they are unable to shake the capturing unit away from the target, the player with the capturing unit wins.
- If the informant marker/model moves off the table, he has escaped and the mission is considered a Draw. Play Misison 0501-DW015: The Field Where I Died.
Rewards
- Mission Reward: Insider Information – At the end of Deployment, you may choose to redeploy any one unit as if it had Infiltrate or you may choose to redeploy any two units normally.
- Campaign Reward: Intelligence Network – If Cover is being used, you may select one covered unit which no longer counts as having cover. If an opponent Deep Strikes and deploys within 12" of one of your units, you may immediately move your unit an additional 6" in any direction. Your opponent may not use Infiltrate against you.
Results
If the Space Marines win go to Mission 0501-SM005: The Emperor's New Head on a Silver Platter. If the Chaos forces win, go to Mission 0501-CM010: May the Warp Gods Dance on Your Grave.
Chapter 2 – Mission 0501-SM005: The Emperor's New Head on a Silver Platter
Imperial Daemonhunters question the informant (Fruzzuh Nurfle) about his loyalties and heretical dealings with the Emperor's Foes, the Chaos forces plan to assassinate Nurfle, fearing what he may know and be able to tell the Imperial soldiers.
Mission Details
- Points Value: 900 Points (Both)
- Game Type: Sabotage Raid
- Game Length: Variable
- Third Parties: Yes
The Daemonhunters have set up sentries outside the Informant's Hideout and will be questioning him in there. The Chaos forces must detonate their demo charges before the game ends. The game ends for the Space Marines when the Daemonhunters have extracted the information they need from Nurfle or when the Chaos forces have completed their objective. To determine when the Daemonhunters' job is done, begin rolling 1D6 before each turn starting with turn four and use the following table to determine how long it takes them (the Space Marines player should roll this):
| Turn: | 4 | 5 | 6 | 7 | 8 | 9 |
|---|---|---|---|---|---|---|
| Roll: | 6 | 5+ | 4+ | 3+ | 2+ | 2+ |
Note that the game ends in a draw after turn 10 if neither player has accomplished their objective and the next mission will be Misison 0501-DW015: The Field Where I Died.
Rewards
- Mission Reward:
Space Marines: Help From Above – The informant reveals pertinent details about the Chaos forces including locations and corrdinates. For the next mission the Space Marines will receive orbital bombardment in the form of an Ordinance blast once every two turns starting on turn 2 during the Shooting Phase. The blast should be treated as Ordinance: S9 AP3 with a LOS scatter (1D6).
Chaos Marines: Secrets Kept – During the next mission the Space Marines' lack of reliable intelligence gives Chaos the upper hand. They may choose two units to be deployed with Cover.
- Campaign Reward:
Space Marines: Spoiler Warning – The informat reveals the details of the Chaos alliance with the Orks. As a result the Chaos forces will not receive the benefit of the Orks assistance during the final mission. See the I Left My Heart in Jarkanium details for more information.
Chaos Marines: Unexpected Assistance – During the final mission, the Chaos forces may start with 350 points worth of Orks in Reserve.
Results
If the Space Marines win go to Mission 0501-SM006: For Higher Ground. If the Chaos forces win, go to Mission 0501-CM011: Cliff 'Em All.
Chapter 2 – Mission 0501-SM010: May the Warp Gods Dance on Your Grave
The Chaos forces have located an ancient burial ground teeming with Psychic power. Part of the focused Warp energy comes from ancient weaponry buried with the dead in ceremonial caskets. The Chaos forces have secured the Burial Grounds for now, but the Space Marines are closing in to thwart their plans and possibly gain some value from the treasure buried there themselves.
Mission Details
- Points Value: 1,200 Points (Both)
- Game Type: Hold at All Costs
- Game Length: Variable
- Third Parties: Yes
- Terrain Boards: C-2, C-3, D-2, D-3
- Special Rules: Psykers must perform a psychic test each time they attempt to use a psychic ability, even if the test is normally not required or the unit has an ability which acts as if psychic tests were automatically passed. This is due to the swirl of Warp forces decending on the area as Chaos excavators disturb the balance of the burial grounds. Models within the burial grounds walls take a penalty of -5 to their Leadership. Models within 6" of the nearest burial grounds wall take a -4 penalty. Within 12" they take a -3 penalty; within 18" they take a -1 penalty. Models further than 18" away from the burial grounds perform this check as normal.
The Chaos forces must hold the Space Marines at bay while they attempt to tap into the Warp energies.
Rewards
- Mission Reward:
Space Marines: Warp Reflection – The Space Marines' interference has made the Chaos forces command over the Warp temporarily tenuous. During the next mission all Chaos Psychic tests and summoning rolls are performed at -1.
Chaos Marines: Unexpected Results – The warp-trapped souls of the burial grounds have been unleashed and are affecting the minds of Chaos foes. Summoned Daemons are have +1 Strength (to a maximum of 7; S7 or higher daemons do not benefit from this ability) and Daemonic Instability tests get +1.
- Campaign Reward:
Space Marines: Ancient Weaponry – Within the ceremonial caskets of the dead powerful weapons are found. The Space Marines may choose one mounted, immobile weapon to deploy on their side during the final mission: Heavy Sniper Rifle – 48" Sn/a AP5 Heavy 1, Sniper; Ancient Gattling Gun – 48" S7 AP4 Heavy 2, Rending; or Triple Mortar – G24"-48" S4 AP5 Heavy 3, Blast. These weapons must be manned by at least two models who may be a part of any unit for points cost but are not required to maintain cohesion with the unit. If these models are wounded, the weapon is considered to be unusable (there is no one else trained enough to man them).
Chaos Marines: Warped Weapons – The daemon souls of the burial grounds find a resting place in the weaponry of a Chaos unit. These weapons do not count toward the Daemonic weapon totals for the force. Possessed weapons are upgraded to Rending if the weapons are Bolters or Autocannons, Plasma weapons do not have the Gets Hot rule (or receive an Assault +1 bonus if they did not have Gets Hot to begin with), Strength +1 for Flamers and Melta weapons receive +4" to their range. All other weapons are unaffected. Note that there are only six daemon souls to possess weapons so units with more than six models or weapons may only apply the upgrades to six weapons. Also, weapons must be upgraded in order of listing so if there are six bolters and two plasma weapons in a unit, the bolters all get the upgrade but the plasma weapons do not.
Results
If the Space Marines win go to Mission 0501-SM006: For Higher Ground. If the Chaos forces win, go to Mission 0501-CM011: Cliff 'Em All.
Chapter 2 – Mission 0501-DW015: The Field Where I Died
In the barren deserts of the North, two scouting patrols bump into each other on routine patrols.
Mission Details
- Points Value: 700 Points (Both)
- Game Type: Patrol
- Game Length: Variable – The base game is 3 turns. Roll a D3 to determine how many additional turns are played; then roll for Random Game Length as normal.
- Third Parties: No
- Terrain Boards: Use 2 2'x3' desert boards. Use minimal terrain; no cover saves better than 5+ should be available and no dangerous terrain is allowed.
- Special Rules: No units with 2+ saves, more than 2 Wounds or the Slow and Purposeful special rule may be used. Weapons with 32" range or higher cost double their listed points. For example if a model may upgrade to a Lascannon (48" range) for +30 points, the upgrade costs +60 points in this mission. Models and units that come equipped with long range weapons are not affected by this.
- Force Organization: No Independent characters are allowed. No Heavy Support units are allowed. Instead of Heavy Support, you may select one additional Fast Attack unit.
In the open desert, two scouting patrols cross paths. Deploy according to the Patrol deployment rules in the Warhammer rulebook, except players must use the table corners and may not choose a table edge. Standard Victory points determine the winner.
If this mission ends in a draw due to Victory Points, discount the 10% rule and go by exact points. If the game is still a draw, recount Victory Points omitting 1/2 points value scores (only count destroyed, off-table or falling back foes, for example). If the game still results in a draw, the mission counts as a draw. A player who achieves a Victorious Slaughter! gets Double Victory and may take both this mission's Mission Reward and the previously tied mission's Mission Reward. Campaign rewards are still determined as normal.
Rewards
The player who wins this mission is treated as if they had won the previously tied mission, receiving Mission Rewards for that mission provided they could have otherwise met the victory conditions for that reward. They receive the Mission and Campaign Rewards for that mission. However, the winning player may instead choose to replace one of those rewards with one of the following rewards. Note that a player may not take both Sandblasted Foes and Experienced Scouts, even if they were ineligible for both previous mission rewards (unless they achived a Victorious Slaughter! in this mission, as above).
- Mission Reward: Sandblasted Foes – Your opponent spent so much time in the dusty sand their equipment is in need of extar repairs. During the next mission any models which participated in The Field Where I Died and survived to be included in the next mission are subject to Weapon Jammed. Additionally, any vehicles used in The Field Where I Died are considered to be under repairs to clean the sand and grit from mechanical parts for the next mission and cannot be chosen. They do not count as casualties for Victory Point purposes.
Weapon Jammed – On a To Hit roll of 2 or 1, the model's weapon jams, breaks or otherwise malfunctions. No shot is fired, even if a 2 would have been enough to hit. The model is then incapable of participating in the next Shooting phase although they may participate in Assaults as normal. Starting with the second Shooting phase after the jam, roll a D6 to see if the model is able to unjam or repair the weapon. The weapon unjams on a roll of 4+.
- Campaign Reward: Experienced Scouts – The winning army may field one basic Troops unit as if they were Scouts during the mission I Left My Heart in Jarkanium. Any units used in this manner may not contain more than 9 models (count models in this case as they would be counted for Outnumbering purposes).
Results
The winning player is considered to have won the mission which previously ended as a draw. All normal conditions for receiving that mission's rewards must be met.