Warhammer 40,000 Campaign Outline
Below the Surface
A Three-Way Warhammer 40,000 Campaign: Space Marines, Chaos Marines and Necron
Table of Contents
Backstory
The Imperial Sharks Space Marines have tracked and pursued the warships of Gnoll Artanius' Unhallowed Horde traitor marines to the Mador Maero planetary system. Despite occasional rearguard fighting, the Chaos forces seem to be less concerned with the Emperor's finest and more concerned with reaching their destination. As they close in on the planet Triste near the center of the system, scanners detect a strong Necron presence from the surface, but the Chaos forces descend undeterred.
As both sides set up base on the planet's surface and rumor spreads that Artanius himself has descended from his Planet Killer to Triste's lush plains, the Space Marines are nearly slavering to destroy this threat to the Throne once and for all. But their exuberance is tinged with a nagging doubt as to what could be so important on this otherwise unremarkable world, and the presence of the merciless Necrons does little to encourage confidence...
Preparation
This is a three-army experience campaign featuring Necrons, Space Marines and Chaos Space Marines. All three armies are fighting for control of the planet, although various campaign trees may result in uneasy, temporary alliances.
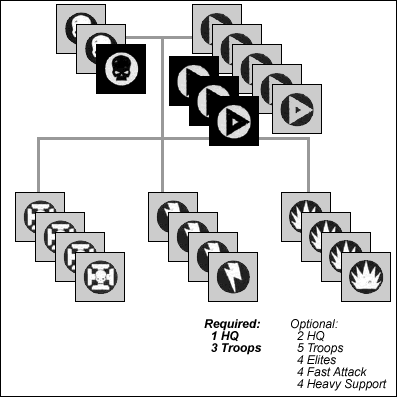
Each player (army) needs one 3,000 point army list. This army list will need to be in a Force Organization, however it is difficult to maintain standard Force Org with that many points for many armies. Because of this, the following Force Organization will apply for the 3,00 point list:
Printable unit cards may help in tracking the status of each unit. The PDF includes infantry and vehicle unit cards.
Each army will need to include one HQ model/unit which serves as the army's Commander. This unit is used normally except occasionally the Commander may not be used or may be required as an HQ choice in a particular mission. This model should be some sort of character and have some fluff or backstory associated with it.
In addition to the 3,000 point list, each player will need a Kill Team squad (see Warhammer 40K 4th Edition book starting on page 214). It is probably a good idea to develop a Kill Team with several possible configurations depending upon the requirements of the mission at hand. It is not required but could be useful to also model a Brute Big Boss.
The campaign takes place in various locations around the surface of the planet Triste. Triste boards should be built as needed for each mission to be played. Using 2' x 3' boards should result in a variety of 4' x 6' playing areas for use during the campaign.
In addition, each player will need to build a 2'x 3' base board. Each army's base should be reflective of a temporary encampment but reflect the tone or theme of the force. The total area of the base should be no more than 24" square, although this may be a single large fortress, several smaller shanties, a series of smallish barracks or any other structure deemed appropriate. The base should be placed in the center of the board with 9" buffer to the long edges and 3" buffers to the short edges. The orientation of the base is not significant. There must also be a temporary power station within each base, at least some sort of perimeter with entrances on three sides (gated, guarded or open) and no more than two stationary or base-mounted armaments. Armaments may be S6 or less, Twin-Linked, AP3 or less (eg AP4, AP5, etc.). Armaments beyond these requirements or in excess of two must be purchased during missions featuring the army base as vehicle upgrades. Opposing players must be informed of the points value of each additional base weapon and agree as to its value. The Necron base should be more of a collection of portals, perhaps even several stationary Monoliths or Monolith-type structures representing the Necrons unexplained interest in this world which is obviously not a Tomb World.
Campaign Rules
Special Necron Rules
As noted below, Necrons do not benefit as normal from experience and are not subject to Recovery. In addition to this, the Scenario Special Rule may appear in the mission card which states "Objective Phase Out."
Objective Phase Out
For battle missions in which the armies are mostly trying to pummel each other, the normal We'll Be Back and Phase Out rules as listed in the Necron Codex apply. However, the Necrons are adamant about preventing the meddlers from taking over Triste and in some cases they will have very specific objectives which they will pursue to the last man (or machine) as would many other armies. During these missions, Phase Out works a little differently.
Objective Phase Out missions change the We'll Be Back roll from a 4+ to a 5+. In this case the Necrons are devoting more resources to achieving their goals than to replacing fallen soldiers. In addition to this, when the models marked as Necrons are reduced to 25% of their original number, phase out proceeds without the automatic loss and only units marked as Necrons plus any Monoliths are subject to the Phase Out, rather than the whole army. Any Necron unit which is not a Monolith which is at 100% or greater of its original number may roll a 3+ save to resist the Phase Out entirely; Necron units which are at 75%-99% their original number may roll to resist Phase Out at 4+; units which are at 55%-75% must roll 5+ to avoid Phase Out. Units that do not count as Necrons remain on the table and continue fighting as normal.
If an Objective Phase Out occurs, all other Necron restrictions still apply (they are not subject to Recovery, may not declare Fighting Withdrawals, etc).
Recovery Rules
Unless otherwise noted, models who are wounded and counted as casualties are considered to be mending at the army encampment for the next mission. This includes independent characters. Units which are counted as casualties for victory point purposes due to falling back or deep striking off the table are considered unwounded for purposes of the next mission, however.
Units which are subject to recovery rules may adjust their points value for the next mission if they wish to deploy under-manned, but they must meet the minimum requirements for the unit type. Players may temporarily combine squads in order to take full advantage of the points available to them especially when a battle which resulted in heavy losses is followed by another high points value battle. However, the additions of the new soldiers to a different squad will cause interruptions in the cohesiveness of a unit and therefore the unit accepting the temporarily assigned troops will automatically lose 50 Experience Points and must roll a Leadership Test (using the rules on page 244 of the rulebook) to avoid losing even more XP. Note that this experience loss is permanent, even if the reassigned troops depart and rejoin their squad after the Mission. Also it does not affect the XP of the unit devastated by loss and recovery; their experience has suffered enough from getting wiped out.
Because they are already undead, the Necrons are not subject to Recovery at all. However, they do not benefit from experience or Battle Honors, either.
Space Marine units which contain a Medic are not susceptible to Recovery, unless the Medic is also Wounded.
Vehicle Recovery
Vehicles can be repaired from minor damage pretty easily and quickly by skilled technicians working for 40K armies. More extensive damage requires additional repair time, though.
If a vehicle suffers a Crew Stunned or Crew Shaken hit, they do not require any recovery time at all. However, if a vehicle is Immobilized or has an Armament Destroyed, it will require one Mission's time to repair all the damage. However, a player may choose to deploy a slightly damaged vehicle with quick-and-dirty repairs slapped together for vehicles that suffer these types of hits. In these cases no recovery time is needed, but if the vehicle took an Immobilized hit its movement distance is halved and you must roll 1D6 prior to each movement phase in which the vehicle is going to move to check and see if the jury-rigged repair job holds. On a roll of 1 the vehicle's repairs give way and the vehicle counts as destroyed but does not grant the other player Victory Points. If the vehicle took an Armament Destroyed hit in the previous mission, it may be deployed without recovery. The armament(s) destroyed in the previous mission are prone to failure so each time the weapon is fired roll 1D6 and make a 4+ save against weapon failure. If the weapon fails, the vehicle suffers an automatic penetrating hit.
Note that for vehicles rushed back into combat in this manner, any Armament Destroyed hits inflicted by the opponent will automatically affect the previously damaged weapon(s) first, although if there are multiple damaged weapons the shooting player may choose which one is fully destroyed.
Vehicles rushed back in without recovery may continue to be rushed without full repair for as long as the player wishes to continue to taunt fate, but these same rules apply until the vehicle has been given a complete mission to be fully repaired.
Vehicles which are in range of a Techmarine when they suffer an Armament Destroyed or an Immobilized hit may recover as if they had not taken the hit and need not be rushed into combat.
If a vehicle suffers a Vehicle Destroyed! glancing hit, treat the vehicle as if it had been immobilized for recovery purposes. If the Vehicle Destroyed! hit is from a penetrating or ordinance penetrating hit, the vehicle may not be rushed back into combat and recovers like an infantry unit, sitting out the next Mission while it undergoes servicing.
If a vehicle suffers a Vehicle Explodes! hit (ordinance or penetrating), the vehicle must be pieced back together from little bits of shrapnel or a replacement must be shipped from orbit, and therefore the recovery time is two missions.
Vehicles which suffer the rare Annihilated! hit (ordinance) may not be used further in this campaign as there is not enough left to even fill a paper sack. A player suffering this setback may have his commander use every favor he is owed to expedite a new shipment from the army's homeworld, but doing this requires the player to subtract 500 Experience Points from 1D6 units, with the unit's XP being reduced only to zero if they have less than 500 XP. This penalty can not be applied to units with 0 XP. If the amount of Experience to be subtracted exceeds the player's total amount of Experience, they simply start from scratch, experience-wise.
Kill Team and Brute Recovery
Several missions in this campaign are Kill Team missions. Kill Teams for this campaign can be modeled in one of two ways:
- The Kill Team may be a specially modeled unit with distinctive paint job or modeling techniques, or just a select number of models set aside as an exclusive Kill Team.
- The Kill Team may be comprised of random models from the normal army pool.
While it is probably easier and certainly more flexible to create a Kill Team from the models available in the entire army, and this is certainly allowed, to discourage this Recovery rules apply slightly differently for Kill Teams.
If a Kill Team is a specially modeled unit (called a Dedicated Kill Team), they may not be used as units or parts of units in normal missions. However, because they are dedicated to Kill Team missions, they are never subject to Recovery. Also, Dedicated Kill Teams qualify for the Specialist Kit carry-over rules which indicate that a Kill Team may select an additional Specialist Kit choice from the list for each KT mission it has completed without being obliterated (killed to the last man).
Non-dedicated Kill Teams are hodgepodge collectives who do not work together as a crack team but are assembled on the fly as events warrant. Due to this they never have the opportunity to gel and therefore earn no extra Specialist Kit. They may, of course, take their standard one per KT mission.
Aside from Specialist Kit restrictions, non-dedicated Kill Teams may be assembled from any models which are not subject to normal Recovery for the mission and which did not suffer a Wound in a previous Kill Team mission or the last non-Kill Team mission.
Models used as Brute Squads are not subject to recovery although models used as Big Bosses, unless modeled specifically for that purpose, are subject to normal recovery rules. Big Bosses which are modeled as such cannot be used in normal missions (like Dedicated Kill Teams) but can be used in any/all Kill Team missions, even if they occur back-to-back.
Example: A player is building a non-dedicated Kill Team from a Space Marines army. In the Space Marine's previous mission, all the Scouts were Wounded. Since this is the Space Marines next mission, the Scouts would normally not be able to participate so they are excluded from the Kill Team roster. The Space Marine player also has a Veteran Sergeant and a Devastator he used in the previous Kill Team mission (some four missions ago). However, in that mission the Veteran Sergeant was killed while the Devastator survived. In this Kill Team mission (and indeed, all future Kill Team missions during the campaign) the Veteran Sergeant is excluded from the Kill Team roster, although the Devastator may continue to be included.
Fighting Withdrawal
At any time a player may declare a fighting withdrawal. This means they forfeit the mission but they try to escape the battle with as many units intact as possible. The strategic reason for this is typically to avoid a rout in a high point value mission if the next mission is likely to also be high point valued and the player fears not being able to field a complete force considering the recovery rules (above). Note that if a player cannot fill the points value for a mission due to recovering models, they must field as much of an army as they can anyway, they do not get a reprieve from the recovery rules.
A fighting withdrawal may be declared at any time, but no action is taken until the beginning of the player's next full turn. At the beginning of the withdrawal turn, all units capable of movement (including units falling back, although they are considered to be falling back for the remainder of the mission) move 6" toward the nearest table edge. Specific units may attempt to ignore the withdrawal order by passing a Leadership test with the usual modifiers and an additional -1. Once the initial sprint from the battle is complete, units may make their normal moves except that units embarked in a vehicle may not disembark and units locked in combat at the beginning of the turn are subject to an immediate Sweeping Advance from assaulting foes. If all units are off the table or have at least one model within 6" of the table edge, the army is considered to have successfully retreated and the mission ends. Otherwise, the normal Shooting Phase takes place and the opponent has a chance to cut off their escape. Units in a fighting withdrawal may not charge. Each subsequent turn in a fighting withdrawal is treated exactly the same with the initial 6" sprint and so on until the game is over.
Note that a player may not initiate a Fighting Withdrawal while the force has units in Reserve. Reserve units need not be deployed (once they are within range the deployed forces may radio to warn them of the dire situation and instruct them to hang back) but they must all be successfully rolled into play before the Withdrawal order can be initiated.
Note: Obviously, Necrons need never initiate a Fighting Withdrawal as they are not susceptible to Recovery.
Third Party Joining
Occasionally a mission may call for Third Party Joining, which means that the normally two-player mission may be joined by the third force whom act as spoilers to the initial conflict.
If Third Party Joining is mandated it will say so on the Mission Card, otherwise TPJ occurs randomly. Before the beginning of Turn 1, the third party player rolls a D6+2. The result is the turn in which the third party player may begin to join the battle. If the result is higher than the number of turns in the mission, the Third Party does not join the battle. If no Third Party player is available, no Third Party joins the battle. Third Party always have 60% points values of the lowest point value force in the mission. So if the mission is 1,000 points for both Chaos and the Space Marines, a joining landing party will be 600 points strong.
Third Party Deployment
Between the first and second player's phase of the turn in which a Third Party is joining, the Third Party player makes a reserve roll for each unit where the target number is 5 plus:
| Unit Type | Reserve Target Modifier |
|---|---|
| HQ and Troops | +0 |
| Elites | +1 |
| Fast Attack and Heavy Support | +2 |
During each consecutive turn, re-roll reserve for each undeployed unit, with a -1 modifier to the base target number.
Note that units which contain multiple types (such as HQ characters with Elite retinues) count as a unit type with the highest modifier.
Example: A player with Chaos Space Marines is the Third Party for a mission. Before the beginning of the first turn, the CSM player rolls a D6 and gets a 1. The CSM forces will begin to arrive in the middle of Turn 3. The points value for the mission is Necrons: 1,200 and Space Marines: 1,000. The CSM forces get 600 points worth of troops, and the CSM player selects a Chaos Lord with a Retinue of Chosen, two small squads of CSM troops and a unit of Raptors. The Necrons go first and after their phase on Turn 3, the CSM player rolls for deployment. He rolls a 5 for the HQ unit, a 6 for one Troops unit and a 2 for the other Troops. The 3 is not enough for the HQ because the Retinue counts as an Elites choice (+1), the 2 is not enough for the second Troops unit. The Raptors would require a roll of 7 so they cannot be deployed on turn 3, although they may arrive on a roll of 6+ during turn 4 or a roll of 5+ on turn 5 or a 4+ on turn 6.
Third Party Recovery and Winning
Since Third Parties are unlikely to win and cannot be relied upon to join any given battle (therefore are not accounted for in the Mission Cards Winning listings), they do not count their victory points as normal nor are models used in a Third Party raid subject to recovery. Instead, Third Party units earn 200 experience points just for participating; all other experience points are calculated as normal.
Winning Missions
Many campaign missions are determined by Victory Points. Some missions require armies of discordant point values. Because of this, the Margin of Victory table on page 86 of the rulebook is slightly altered.
Players playing with fewer points (note that points are calculated by totals including reserves, even if they never reach the table) are granted a Victory Points handicap, which is an automatic Points grant of 50% of the starting points difference. For example, a player with 500 points battling a player with 1,000 points starts off with 250 Victory Points as a handicap. This means armies granted an advantage in starting points had better use them to their best advantage.
Players may not adjust the starting points value of their force to grant themselves a handicap and units/models subject to recovery do not grant handicap values, either. The starting points represent how many units the army commanders demand into the conflict zone; lack of ability to comply due to poor resource management or misfortune is not the same as a tough situation. Initial starting values for the missions are best thought of as the Mission "odds" with a mission that has all forces starting equally being thought of as "even odds of success by any participant." Unfortunately in war odds of success are not commonly even.
Additionally, there are several additional gradations of victory, as listed below:
| Victory Points Difference (Percentage of Highest Points Limit) |
Result |
|---|---|
| 1% – 5% | Draw |
| 6% – 15% | Marginal Victory |
| 16% – 40% | Decisive Victory |
| 41% – 70% | Solid Victory |
| 71% – 85% | Crushing Victory |
| 86%+ | Slaughter! |
Indecisive Outcomes
Anytime the percentage difference is less than 15%, the victory is said to be less than decisive and additional measures may need to be taken to determine a winner. For this reason, do not move any models after the end of regulation play. Additional turns may be required!
Calculate the Victory Points and the Margin of Victory. Do not apply any handicap points at first. If the outcome of the mission is in favor of a force who began the match with a handicap and they had a higher victory points total not including the handicap points, they automatically win even if the match is a Draw or Marginal Victory. Fighting to a standstill when faced with overwhelming odds is a victory in itself!
Otherwise, use the following rules to handle Draws and Marginal Victories:
Draws
If the Margin of Victory is extremely close, immediately play another Turn. This is why it is important not to remove models from the table until after Victory Points have been calculated.
At this point in the skirmish, battle fatigue will begin to set in. Because of this, all Leadership rolls suffer a -1 penalty, including Psychic Tests. Also charges no longer provide +1 attack. Treat this Turn as either Night Fighting (Dusk) if the rest of the mission took place during the day or as normal if the rest of the mission was Night Fighting.
Repeat this process until the Margin of Victory improves, or until one player declares a Fighting Withdrawal (which automatically forfeits the game; the play of a Fighting Withdrawal need not be carried out if declared during a Draw turn.).
If the Margin of Victory cannot be rounded up to 1% or more, the match is immediately over and considered a True Draw. No rewards are granted to either player and any other victory (such as future mission Primary designation) are determined via a coin flip.
Marginal Victory
Occasionally a mission will be close: One army may have a tactical advantage or have depleted the opponent's forces but not have emerged victorious in a decisive manner. Perhaps if the other army had just a little more time...
If the Margin of Victory is greater than a Draw but less than 15% the victory is Marginal. Sometimes in these cases a losing force may choose to press on and try to pull out a come-from-behind victory. To determine if the losing army is capable of Pressing the battle further, the losing player picks either High or Low. Then the player with the Marginal Victory rolls a D6. That becomes the Target Number. Make note of it. The losing player then rolls a D6, trying to get either higher or lower, depending on which they chose, than the Target Number. Rolling the Target Number itself counts as success. If the losing player succeeds in Pressing the attack, play another Turn, treating the turn as either Dusk or Dawn depending on how the original mission was played. No additional adjustment apply. Re-calculate the Victory Points after the Turn. If the player who had originally had a Marginal Victory has improved to a Decisive Victory or better, the mission ends. Otherwise—even if the mission is now a Draw or a Marginal Victory in favor of the other player—the original losing player may attempt to continue to Press the attack until they fail to succeed in their Press Test (using the same Target Number) or they pull off a Decisive Victory. Players who Press the attack but fail their Press Test before they achieve a Decisive Victory are considered the losing force, and the opposing player is granted a Decisive Victory. Note that Pressing players may not at any time declare a Fighting Withdrawal. If they want to keep Pressing, they risk being annihilated.
If a Pressing player battles back to a Draw at the end of any Press Turn, they have two choices: They may choose to declare the match a True Draw and forfeit any rewards, determining other outcomes via coin flip or they may proceed with the Draw rules above as normal. If the outcome after a Draw Turn is back to a Marginal Victory for the opponent, as stated in the Draw rules the Pressing player has now completely lost the mission. Pressing players who choose to accept Draw Turns may then declare Fighting Withdrawals as normal.
Note that if a mission ends in a Draw and the result of the Draw Turn is a Marginal Victory the player with the Marginal Victory is considered to have a Decisive Victory. Only use the Marginal Victory rules if the original mission Turns end with a Marginal Victory.
Examples
Player 1 finishes Turn 6 (he went second) on a mission. The points are calculated and the Margin of Victory was in favor of Player 2 by 4%. Turn 7 continues where Turn 6 left off, with -1 Ld penalties, Night Fighting (the original mission was normal daytime combat) and no Attack bonus for charging. After Turn 7, Player 2 has a 14% Margin of Victory and the game ends with Player 2 scoring a Decisive Victory.
A mission in which Player 1 started with 1,200 points and Player 2 started with 900 points ends with Player 1 scoring 655 Victory Points and Player 2 scoring 510 Victory Points. Without the handicap Victory Points, Player 2 has battled to a Draw (4% Margin of Victory for Player 1). With the 150 handicap points (1200 - 900 / 2 = 150) the mission is a True Draw (0.4% MoV).
At the end of a mission Player 2 has a Margin of Victory of 8%, a Marginal Victory outcome. Player one decides to Press the Attack and chooses High. Player 2 rolls a 5. Player 1 then rolls for Press Success and gets a 5: Success! They play an additional Turn and the Margin of Victory after that Turn is still in favor of Player 2, but only by a Margin of 5%. Player 1 Presses again, and rolls a 4, not enough to keep Pressing the attack. Since the Press was unsuccessful, Player 2 is granted a Decisive Victory, even though the current outcome is a Draw.
Three-Way Missions
Some Missions during the campaign require that all three armies fight simultaneously. Some are team-up missions with two armies fighting as one, others are free-for-alls. In free-for-all terms, each player is ranked based on victory conditions for the Mission; if Victory Points determine the winner then the top two armies after the Mission regulation Turns count toward Draw and Marginal Victory rules, the player behind the other two immediately removes his models from the table which counts as an automatic Fighting Withdrawal. After that point the extra Turns proceed as normal.
Experience and Rewards
Units that participate in campaign missions earn experience points. The rules for experience that follow are slightly modified versions of those found in the Warhammer 40K 4th Edition rules.
The following table indicates how experience for a unit can be earned (or lost):
| Battle Participation | Each Mission the unit participates in earns 150 XP. | +150 |
|---|---|---|
| Third Party | Each unit which joined a Mission as a Third Party participant receives 200 XP. | +200 |
| On Winning Side | If the unit's army achieved a Decisive Victory, add 50 XP. In multiplayer Missions, the second place player also receives this award. | +50 |
| Free-For-All Victor | If the unit's army won a Decisive Victory in a Mission with three armies, the unit receives 75 XP instead of the normal 50. | +75 |
| Glorious Victory | If the unit's army achieved a victory better than Decisive (Solid, Crushing, etc.) add a second 50 XP. Note that each victory level does not add 50, only add one 50 point bonus for getting better than Decisive. | +50 |
| Effective Assault | Units that:
|
+100 |
| Triumphant Assault | Units that:
|
+200 |
| Effective Marksmen | Units that:
|
+70 |
| Great Shootin' | Units that:
|
+140 |
| Live to Fight Another Day | If a unit falls back after losing an assault and then makes a successful leadership check to regroup, the unit earns 25 XP. | +25 |
| Objective Achieved | If the unit is counted as a scoring unit when determining the winning side, it earns 100 XP. Note that the unit does not need to be part of the winning army, it earns this experience just for doing its part to try and help its team. | +100 |
| Creepy But Effective | In a Mission versus Necrons (does not count against Necrons who are Third Parties), if Phase Out occurs all units receive 50 XP instead of normal objective experience. | +50 |
| Commendations | After each Mission, all involved players may nominate one unit for admirable performance. That unit receives D6x50 XP. | +1D6x50 |
| Unordered Retreat | Units which fall back off the table or voluntarily move off of a table edge when a Fighting Withdrawal has not been declared lose -150 XP (offsetting the experience earned from battle participation but retaining any achievement-based experience). | -150 |
| Owned | If the unit is reduced to 50% or less of its original numbers, or is a vehicle that suffers lasting damage (Immobilized, Armament Destroyed) it loses XP of 1D3x50. This is deducted from the XP earned during this battle but does not reduce the number of Experience Points they had going into the Mission. | -D3x50 |
| Wiped Out | If the unit is completely destroyed or is a vehicle that is Destroyed, it gains no experience from the battle at all and loses 100 XP from its previous total, which may reduce the unit's Experience below 0. | -100 From Total |
Additional experience may be added on a Mission-by-Mission basis, and these extra award-worthy events are listed on the Mission cards.
Benefits of Experience
For each 1,000 XP a unit earns, it gains one roll on the Battle Honors table. Likewise, each time a unit drops below a multiple of 1,000 they lose a randomly determined Battle Honor.
Drawbacks of Experience
Once a unit has reached 3,000 Experience Points, they are considered to be well-regarded within the army and have caught the eye of the commander. Being under the microscope in this manner means that they come to be expected to perform admirably and therefore are no longer eligible to be nominated for Commendations so long as there is another eligible unit without 3,000+ XP. Because Commendation recommendations are subjective, so long as the other player agrees this rule may be broken. For example, a player with two veteran units possessing 3,000 or more XP finish a battle each with several kills and objectives completed. A third unit was pinned down by enemy fire after failing to arrive from Reserves in time to be much help. Technically this third unit should be the only qualifying unit for Commendations, but in this case both players agree that it is better to give the award to a unit which is technically ineligible but obviously more deserving.
In addition to this, the increased scrutiny makes these units' failures even more significant. Any loss of experience (Owned or Wiped Out, for example) is doubled although they continue to earn experience at the same rate.
Specialization Training
Normally Battle Honors are earned and lost based on Experience Point fluctuations. However, in some cases certain units may begin to be "known" for some type of specialization and may begin to train all new recruits in the finer aspects of these particular skills. At any point between Missions a player may choose to voluntarily spend 2,000 XP to permanently add a Battle Honor (which they must already possess) to the unit. This Honor may not be lost due to future Experience loss, including loss from temporarily assigned troops (see Recovery for more details).
Battle Honors
Battle Honors usually offer one re-roll per game for a particular circumstance. In some cases a secondary ability is listed; in these cases the secondary ability may only be taken if the unit already possesses the primary ability (re-roll). Units are not required to take the secondary abilities, they may choose additional re-rolls instead. As always, dice may only be re-rolled once. You may have as many secondary instances of the same honor as you have primary instances, but no more. Therefore, a unit may have three primary honors of the Street Fighters type (re-rolls) and two secondary honors (+1), but not two secondaries and one primary. Like re-rolls, roll bonuses from secondary honors may not be stacked (you may not, for example, add +2 to any given roll; having multiple instances of secondary honors must be used on separate rolls).
Secondary abilities add +1 to a die roll instead of allowing the entire roll to be repeated. Note that the secondary ability may be applied to any roll, even a re-roll, but it must be declared before the roll is made. For example: A unit has both the primary as secondary ability of Seasoned. The unit faces a Morale check. The player may choose to roll the Morale test once and re-roll it if it fails adding +1 to the re-roll. Or, the player may choose to perform the initial check with the +1 bonus, and re-roll the check without the bonus if that fails. He may also choose to save either the bonus or the re-roll for a later check if he wishes.
Note that it is possible in some cases for a Secondary ability to result in an effective automatic success. For example, a Terminator unit with the Heads Down secondary ability can automatically pass one Armor Save check (2+ save, +1 to the roll means the lowest roll is 2, passing the check). This is perfectly valid use of the Secondary ability and the roll need not actually be made. Remember that the bonus may not be added after the roll takes place, though: The automatic success must be declared ahead of time.
For each Honor earned (each 1,000 XP), roll 1D12 on the following table:
| 1 | Street Fighters. May re-roll a Difficult or Dangerous Terrain test. Secondary: Add +1 to a Difficult or Dangerous Terrain test. (Jetbikes re-roll this result) |
|---|---|
| 2 | Grizzled Veterans. May re-roll failed To Wound rolls from a single turn of Close Combat. |
| 3 | Marksmen. May re-roll failed To Wound rolls from a single turn of Shooting. |
| 4 | Seasoned. May re-roll a failed Morale check. (Fearless units re-roll this result) |
| 5 | Tank Killers. May re-roll an Armor Penetration roll. Secondary: May add +1 to an Armor Penetration roll. |
| 6 | Camouflage Artists. May re-roll a failed Cover Save check. Secondary: May add +1 to a Cover Save. |
| 7 | Natural Survivors. May re-roll test to avoid a Sweeping Advance. Secondary: May add +1 to Initiative for the purposes of avoiding a Sweeping Advance. (Space Marines may re-roll this result) |
| 8 | Punctual. May re-roll a Reserves check roll. |
| 9 | Heads Down. May re-roll a single failed Armor Save. Secondary: May add +1 to an Armor Save roll. |
| 10 | Diggers. May request that opponent re-roll an ordinance scatter. |
| 11 | Accurate Strikers. May re-roll a Deep Strike scatter (inches die only). Secondary: May re-roll the Scatter die for a Deep Strike roll. (Units without Deep Strike or who may not take Deep Strike as a Veteran Skill may re-roll this result) |
| 12 | Choose Honor. Select one of the above honors. |
Roll a D8 on the following table for vehicles granted honors. Note that Vehicle Honors do not include Secondaries.
| 1 | Imposing. Owning player may request that an enemy unit Tank Shocked by the vehicle re-roll its Morale check. (Walkers re-roll this result) |
|---|---|
| 2 | Hardened Crew. Owning player may request an enemy re-roll the result of a glancing hit against the vehicle. |
| 3 | Reinforced Armor. Owning player may request an enemy re-roll the result of a penetrating hit against the vehicle. |
| 4 | Skilled Gunner. May re-roll a failed To Hit roll. |
| 5 | Veteran Gunner. May re-roll a Scatter die or a failed Armor Penetration roll. |
| 6 | Skilled Pilot. May re-roll a Dangerous Terrain test. (Skimmers re-roll this result) |
| 7 | Veteran Pilot. May add +1 to a Dangerous Terrain test (declare before the roll). (Skimmers re-roll the result) |
| 8 | Choose Honor. Select one of the above honors. |
Campaign Honors
Occasionally certain pivotal missions will provide a player's entire army with some sort of useful boost or advantage. Necrons may use these honors, unlike normal experience-based Battle Honors. Benefits granted to only select armies are listed in brackets following the item using the army's abbreviation. CSM = Chaos Space Marines; SMN = Space Marines; NCR = Necron. All Campaign Honors may be stacked where applicable, adding one more instance of each ability to the player's pool.
Base of Operations
A local base has been established to help with deployment, recovery and tactics. Players with this honor may:
- Re-roll one failed Reserves test per game.
- Re-roll one failed Leadership test per game (does not count for Psychic tests, only Morale, Pinning, Target Distant Unit rolls, etc).
- All HQ units are not subject to Recovery unless a special rule states otherwise. [SMN, CSM]
- Vehicles which suffer a Vehicle Annihilated! hit count as Vehicle Explodes! for recovery purposes. [SMN, CSM]
- Re-roll one failed We'll Be Back test per game. [NCR]
- Re-roll one failed Phase Out Resistance test (in Objective Phase Out missions only) per game. [NCR]
Rallying Victory
The army has achieved a victory when they most desperately needed to. Players with this honor may:
- Charge up to 8" once per game with the usual +1 attack modifier or charge up to 10" once per game without the +1 attack modifier.
- Once per game, add +1 to their Initiative before a Sweeping Advance check (offense or defense) or re-roll a Sweeping Advance check once per game.
- Treat one Morale check per game (Tank Shock, Pinning, Fall Back) as if it had succeeded before any dice rolls.
Opposition Insight
Some superb scouting, intercepted battle orders or lucky guessing has given the commander with this honor a foresight into his opponent's movement. Players with this honor may:
- Redeploy one unit after all other deployment is complete. If both players have this Honor, the player with the most instances of it goes last, otherwise randomly determine who goes first, second, etc.
- Request an opponent re-roll one successful Reserves check per game or request an opponent re-roll a Deep Striking unit's scatter (distance and Scatter die) once per game. [NCR, CSM]
- Force an opponent to deploy normally during a Hidden Set-Up mission. [SMN]
- Deploy Infiltrating units with 10" no-LOS and 16" LOS. [CSM, SMN]
Misdirection
Through subterfuge the commander has been able to influence his opponent's intelligence network and feed false orders or introduce chaos into the opponent's armies. Players with this Honor may:
- Redeploy one of your opponent's Troop units immediately after they have deployed it.
Negotiations
The army's commander or other figurehead has developed a keen knack for wartime negotiations, be it diplomatically handling the return of prisoners of war, negotiating surrender terms or agreeing on alliances. Armies with Negotiations:
- Are not required to perform a normal Fighting Withdrawal if they wish to forfeit a mission. By declaring a Fighting Withdrawal they roll 1D6 per Negotiations award, discarding all but the highest. The table below dictates the results:
- Catastrophic Negotiation Error: No Fighting Withdrawal is allowed; play continues until the normal end of the game and all Leadership rolls are an additional -1.
- Negotiations Unsuccessful: Perform a normal Fighting Withdrawal.
- Buying Time: Negotiation proceedings bought the army enough time for a disciplined retreat; Withdrawing army may move all units 2D6" (roll for each) toward the nearest escape point before a normal Fighting Withdrawal is taken and are not subject to Sweeping Advances.
- Negotiations Successful: The game is immediately forfeited with no withdrawal movements required and no additional casualties.
- Negotiations Successful: The game is immediately forfeited with no withdrawal movements required and no additional casualties.
- False Negotiations: The surrender negotiations have been a ruse to buy time for the reinforcements to arrive. Player may choose to either treat this roll as Negotiations Successful or they may roll 1D6x100 using the results as points to build a reserve force. The reserves are available on a 2+ in any turn starting with the current turn and may enter from any board edge but may not be deployed within 12" of an enemy unit or model.
- May choose to prohibit any Third Party from taking offensive action against them for up to two consecutive turns. If a player uses this ability, they may not attack the Third Party until they have been fired upon or assaulted in the Third Party's previous turn. [NCR]
Standard Issue Recoil Suppressors
The army has received recoil suppressors for their Rapid Fire weapons to assist in moving and taking aimed shots. Armies with Recoil Suppressors:
- One unit's Rapid Fire weapons may be fired once at their maximum stationary range even if the unit moves, provided no model in the unit moves more than 5" (for any reason) in the Movement Phase.
Mission Tree
In the Mission Cards below the original scenario rules have been included as reference. Wherever the Mission Card listings differ, the Card overrules the scenario. So if a scenario lists Concealment but the Mission Card does not, Concealment does not apply for the Mission. The text of most standard scenario Special Rules is listed below, but in some cases deviates from the original texts listed in Warhammer 4th Edition. The rules below overrule the official rules for the sake of the campaign.
Mission Special Rules
Concealment
All non-vehicle units that are deployed at the beginning of the mission are assumed to have made efforts to conceal themselves before the battle, even in open terrain. Deploy concealed units using generic markers instead of the unit models themselves and other than vehicles you may ignore deployment order. Note which marker belongs to which unit. If a concealed unit is fired at, the firers must determine if they can actually see their target: Roll 2D6 and multiply the result by 3, rolling once per unit firing only. This is the maximum range that any non-barrage weapon can be fired at. If the shooters have selected a marker to be fired at beyond this range, they cannot see the unit and do not fire. Barrage and ordinance barrage weapons may fire at concealed targets but add an extra D6 to the scatter distance.
Concealment is lost (replace the marker with the actual unit models) as soon as the concealed unit moves, shoots or uses a psychic power. If Night Fighting and Concealment are used together, leave all markers on the table until Night Fighting no longer applies or the unit loses its concealment. If Concealment is used in non-Night Fighting situations, it ends after the first turn.
Deep Strike
Deep Striking units begin the game in Reserve (regardless of whether Reserves is in force for the Mission) and will enter the battle via tunneling, teleportation, flying or other extraordinary means. Roll for the arrival of these units and then deploy as follows:
Place one model from the unit anywhere on the table, in the position you would like the unit to arrive and roll the Scatter dice. A HIT roll means the model stays where it is, an arrow scatters the model 2D6" in that direction.
All Deep Striking models are arranged around the first model. Models must be placed in base contact with the original model in a circle around it. When the first circle is complete, a further circle should be placed with each model touching the circle inside it. Each circle should include as many models as will fit, and they may be facing any direction. If the first model scatters off the table, the entire unit is destroyed. Models may not be placed within 1" of any enemy. If you are unable to complete a circle of models without any of them coming within 1" of the enemy, entering impassable terrain or going off-table, the surplus models are destroyed but not subject to Recovery.
Troops arriving via Deep Strike may not move or assault on the turn they arrive. They may shoot as normal, but count as having moved.
Dusk & Dawn
Battles may be fought before first light or so late that dusk falls before an advantage is gained. After deployment but before determining who has first turn, roll D6. On a 1, the battle starts before dawn and the Night Fighting rules are used on Turn 1. On a roll of 6, the battle starts at dusk and the Night Fighting rules are used on Turn 6 and any subsequent turns.
Escalation
This rule is always used in combination with the Reserves rule. Escalation represents the situation where a battle begins quietly and suddenly explodes into action as reserves are deployed. In such a mission only basic infantry units that do not have dedicated transports (no Monstrous Creatures, Bikes, Jump Infantry, Artillery, Beasts, etc.) may be deployed at the start of the game.
Units not deployed are in reserve. Some units such as Scouts have special rules that will allow them to deploy on-table. These rules apply as normal.
Infiltrate
Infiltrators deployed on the table at the start of the game are deployed after all other units. A coin toss determines who goes first if both sides have infiltrators. They may be set up anywhere on the table that is more than 12" from an enemy unit, if no deployed unit can draw line of sight to them. If they are set up in line of sight, they may be anywhere on the table more than 18" from an enemy unit.
Night Fighting
After selecting a target but before a unit fires, roll 2D6 and multiply the result by 3, rolling once per unit only. This is the maximum range any non-barrage weapon can be fired at; if the shooters have selected a target beyond this range they lose their right to fire as they search the darkness for a target that never appears.
Barrage and ordinance barrage weapons may fire at concealed targets but add an extra D6 to the scatter distance.
Random Game Length
At the end of the mission's stated number of turns, roll D6. On a 4+ a further turn is played. Repeat this process at the end of every turn after up to three extra turns. If it is dark on turn 6, it remains darks for the extra game turns.
Reserves
Reserves are troops who can be called in for reinforcements. Do not deploy units in reserve, instead roll on the following table at the start of the Turn:
| Turn 1 | Turn 2 | Turn 3 | Turn 4+ | |
|---|---|---|---|---|
| Reserves unit arrives on: | N/A | 4+ | 3+ | 2+ |
When a reserve unit arrives it must move on as specified in the reserves section of the Mission Card (or as listed in the Deep Strike rules if the unit has that ability). If a unit has a transport attached, roll for both together although the passengers do not have to arrive mounted in the transport.
Note: You must roll for reserves as soon as possible and must bring them onto the table as soon as they are available. You may not delay making the dice rolls or keep the reserves hanging around off-table until you decide you need them! If a reserves roll is missed, roll it as soon as it is remembered and deploy immediately; units deployed in this way may do nothing until your next full Turn.
Fortifications
In some scenarios the defender may set up fortifications. All fortifications must be represented by a suitable model.
There are many forms of fortifications but broadly they represent cover for the defender. Sandbagged positions, trenches, redoubts, makeshift barricades and fortress walls all count as fortifications. The defender may set up as many fortifications as he likes and the scenario set-up rules explain where they may be placed—usually in the defender's deployment zone.
A model in fortifications receives a Cover Save of 3+.
Bunkers
Bunkers will consist of an enclosed structure no more than 8" across in any direction. It should have one access point and vision slits all around.
A bunker may contain as many models as will fit within it without overlapping bases. Each individual slit or 1" length of continual slit allows one model to fire out at targets visible from that slit. Units in bunkers may still only shoot at a single enemy unit.
Bunkers grant a 3+ Saving throw to any models occupying it and they may not be assaulted while the bunker is intact. A bunker is entered and exited by its access point the same way as vehicles. An occupied bunker can only be accessed this way by troops on the same side as the occupying troops.
A bunker can be breached in one of two ways:
- Attacks aimed at the occupying troops may damage the bunker. In any Shooting phase in which a weapon of Strength 8 or more inflicts a casualty on occupying troops, roll a D6 and on a 6 the bunker is breached.
- Attacks can be aimed directly at the bunker. This includes not only ranged attacks but close combat attacks as well. For this purpose it is treated as an immovable vehicle with Armor Value 14 and any glancing or penetrating hits will breach it.
Once a bunker is breached, the Cover Save of occupants is 4+ and they may be assaulted normally, although they will still count as occupying cover. Fortifications may be placed along the tops of bunkers and occupied by troops normally. Attacking troops may either shoot the bunker or the bunker's occupants or any troops on the roof. You may not claim to attack all three even if using blast or template weapons.
Sustained Attack
Occasionally, the enemy will have an overwhelming superiority of numbers, with wave upon wave of foes hurling themselves forward. To represent the size of an attack like this, the player making the Sustained Attack can 'recycle' some of his units when they are destroyed. Recycled units are brought back into play to represent the almost limitless supply of reinforcements.
Any attacking Troops unit that is wiped out may move on from the attacking player's own board edge or either of the short table edges outside the enemy deployment zone. They move on at the beginning of the attacker's next turn.
Units of troops which are forced to fall back and reduced to less than 50% strength in models can be removed from the table immediately and reused as if they had been wiped out in their owner's next full player turn. They do not have to fall back off the table first.
Destroyed vehicles and HQ units cannot be recycled. Note that this includes transport vehicles for Troops units.
Obstacles
Fortifications are not the only form of defenses. In some scenarios the defender may place obstacles.
Razor Wire
If the defender has suitable models then he may set up razor wire. Razor wire comes in 6" sections and defenders get D3+3 sections to start the Mission. Razor wire counts as difficult ground for all non-vehicle models. Vehicles ignore razor wire.
Tank Traps
Tank traps are also 6" long sections and defenders may have D3+3 sections to start the game.
Preliminary Bombardment
In a major offensive, the attacker will often attempt to soften up the target with a heavy bombardment before launching the attack.
Roll D6 for each enemy unit and each section of razor wire and tank traps on the table. On a roll of 6, the unit or obstacle is hit. A squad takes D6 hits from the shelling causing 1 Wound each (make Armor Saves as normal), and must roll a Leadership test or be pinned in their first turn. Place a suitable piece of scenery under the squad if you have on available. A vehicle hit by a preliminary bombardment starts the game stunned (roll for each vehicle in a squadron separately). Troops that start the game in reserve are not subject to preliminary bombardment.
Razor wire sections and tank traps are automatically destroyed and removed from the table by being hit.
Bunkers are not affected by long range shelling, but roll for troops inside them.
Sentries
In certain scenarios the defender has set up sentries to keep a lookout for enemy activity. Sentries can be represented with card counters, but it is preferable to use spare miniatures of the appropriate type (note: These models can be those restricted from play due to Recovery or Dedicated Kill Team/Brute Boss models).
The number of sentries available depends on which army is being commanded. Sentries do not cost extra points.
Space Marines: 6 Space Marines (Initiative 4). Note: Chapters such as the Space Wolves with improved initiative due to Acute Senses only use 4 Space Marines as sentries.
Chaos Marines: 6 Chaos Space Marines (Initiative 4).
Necrons: 10 Necron Warriors (Initiative 2).
At the start of the sentries' turn, both players roll a dice for each sentry model (or marker). The player that rolls highest can move the sentry the distance indicated on the dice in any direction. If the rolls are tied then the defender moves the sentry.
Sentries do not have any Squad Coherency rules and operate independently.
Sounding the Alarm
At the start of the game, the defending forces are not expecting combat. Instead they are resting, etc. Only sentries will be active to start with because of this.
Until the alarm is raised, sentries move as described above and none of the defender's other units may move or fire. The Alarm can be raised in several ways:
- Spotting Distance: A sentry will spot an enemy model that is within his spotting distance at the end of any turn. This distance is equal to his Initiative Characteristic in inches. For example, a sentry with an Initiative value of 4 would spot any attackers within 4" of him, regardless of cover.
- Vehicles: If the attacker deploys any vehicles or bikes on the table the sentries will spot them at the end of the turn. Tanks, Bikes, Dreadnoughts, armored personnel carriers, etc. are all too noisy to avoid detection. Vehicles (including Infantry units with transports) and Bikes may therefore be kept in reserve and will arrive normally after the alarm has been raised.
- Weapons Fire: The alarm is raised if the attacker fires any weapons except sniper rifles. If a sentry survives being hit by a sniper rifle he raises the alarm.
- Close Combat: A sentry that is attacked in close combat will raise the alarm if he survives to the end of the turn. If the sentry is killed in close combat then the noise of the fighting may raise the alarm anyway. Roll a D6. On a 4+ the fighting was heard of the sentry screamed out and the alarm is raised.
- Bodies: If a sentry is killed do not remove the model. Instead, leave it lying down; if another sentry approaches within his Initiative distance of a dead body he will raise the alarm.
Note that all the other defending models with an Initiative value count as sentries for purposes of sounding the alarm, they just can't move. After raising the alarm, all sentries are removed and take no further part in the game. If the alarm is raised during the attacker's turn, they finish it normally. The defender can move and shoot normally with all their forces in their next player turn.
If the alarm is raised during the defender's turn they begin a game turn immediately. The first defender turn is the first turn of the game proper and counts as such for the purposes of determining game length and reserve arrival.
Hidden Set-Up
Forces have had time to conceal their troops to delay their enemy. You need a set-up marker for every unit in the force, even those in reserve or not starting on the tabletop for another reason.
The defender places Hidden Set-Up markers during deployment instead of models. A marker may be placed on any terrain, as long as it can be moved over by the model it is representing and is in the defender's normal deployment zone.
Each marker needs to be numbered so that you can note which number corresponds to which unit.
Hidden Vehicles
Vehicles must be hidden in appropriate terrain features. It is not possible to disguise a Leman Russ tank in an open plain but it could be hidden at the edge of a wood or behind a hill. Vehicles must be hidden behind or in a terrain feature which could conceivably hide the model. Apply common sense.
Revealing Hidden Troops
Once the defender has placed all his Hidden Set-Up markers the attacker then deploys his forces as described in the Mission Card. Once the attacker's deployment is complete the defender reveals his Hidden Set-up markers and places the appropriate models on the table. For a unit of multiple models, one model is placed on the counter with the rest of the unit in 2" coherency as normal with no model more than 6" from the counter. A lone vehicle must be placed on the counter itself. Counters that are used for units in reserve has a chance of being a minefield or a booby trap.
Minefields and Booby Traps
If a counter is for a unit that is not deployed on the board, there is a chance the counter represents a booby trap or minefield instead. When the counter is revealed or triggers, roll a D6. On a 4+ it is a booby trap or minefield (defender's choice), otherwise it is just a dummy and is removed from the table.
- Booby Traps: The player controlling the booby trap may choose to detonate it when an enemy model or unit is within 6" of the marker. As usual, the owner of the target unit chooses the model that takes the damage and resolves a single Strength 8 hit, Armor Piercing 2. Unlike minefields, booby traps only work once, so remove the marker once the attack has been made.
- Minefields: A minefield is an 8" by 4" rectangle, centered on the hidden counter. Any enemy model moving over a minefield triggers a mine on a roll of 4+ taking a Strength 6 hit with no Armor Piercing value. Vehicles take a Strength 6 hit against their rear armor, but all penetrating hits are treated as glancing hits only. Skimmers are affected normally.
Divided Force
This rule is used when a mission calls for an army to be split into an active part and a passive part. The owning player splits his army into two separate forces, each must consist of at least 30% of the total army points value. A dice is then rolled to determine which force is the active force and which is the passive force.
Hit 'Em Hard
Any Heavy Support vehicle units which suffer an Annihilated! Penetrating Hit must wait two missions for Recovery. Any non-vehicle Heavy Support unit which sustains 100% casualties from a Sweeping Advance must wait two missions for Recovery.
Flammable Terrain
Wooded terrain is dry and susceptible to catching fire from the surrounding conflict. Any time fire or heat based weapons (including Flamers, Melta Weapons, Plasma Weapons, Missiles or Blast Ordinance; also includes vehicles exploding) are used within woods area terrain (including firing into, firing out of or having templates which fully or partially cover a section of the terrain), the terrain may catch fire. When a potentially combustible event occurs, roll 1D6; the terrain gets a 3+ save versus ignition. If the terrain ignites, the following occurs:
- Starting with a reasonable point of ignition, the fire will spread 2D6" in all directions per turn. Burning terrain edges should be appropriately marked. The fire area will not spread past water, snow, ice, sand or dirt but will be unaffected by all other terrain types once started.
- Visibility into the burning terrain is reduced to 3".
- Burning terrain requires all non-vehicle models to make a Dangerous Terrain test, even if they would normally not be required to.
- All vehicles, even those which would normally not need to, must make a Difficult Terrain test when passing through burning terrain.
Remainders
Some circumstance has prevented forces from deploying additional reinforcements to the battlefield and/or the mission takes place immediately following a previous mission. In missions where Remainders is in effect, only non-Wounded models (those who would not be subject to recovery) from the previous mission's army list may be deployed. Units with models less than their minimum size (Space Marine troop squads of less than 5 models, for example) may be included in other like units without Experience deficit provided those units do not break any other force organization guidelines in the process. As an example, a player has three Troop units of Space Marines after the previous mission, one with 9 models mounted in a Rhino, one with four remaining models and one with fifteen models. The four model unit may be rolled into the fifteen model unit (nineteen models is less than the maximum 20 models per unit) but not the Rhino-mounted unit since the Rhino may not transport more than ten models at a time. If no qualifying units can be formed, build units to be as close as possible to minimums, using other units' models if possible and fielding undermanned units only where absolutely necessary. Continuing with the previous example, if the larger unit had 19 models to begin with, one of the 19 would have to be moved to the undermanned unit to form the minimum of 5. Should the larger unit have been wiped out in the previous mission, the Rhino-mounted unit would have to sacrifice a model to the undermanned unit. If the remaining units from the previous mission had been two units of two models each, the closest to minimum possible would be one four-man unit.
In a mission where Remainders is in effect and one army cannot meet the minimum Force Organization requirements for the mission, the player may rebuild his army to minimums using the previous army list. However, because these new units will be joining the battle injured or without proper recovery time, they begin the new mission with 1 Wound or, in the case of models with only 1 Wound to begin with, their armor save is reduced by one (3+ saves become 4+, etc.) and any special ability which might prevent them from taking Wounds such as Adamantium Mantle or Daemonic Essence (Invulnerability Saves) are ignored.
Units which fell back off the table or escaped due to a Fighting Withdrawal are counted as Recovering for purposes of the Remainders rule.
This rule is usually used in conjunction with the Random Reserves special rule. This rule has no effect on Necron armies.
Random Reserves
Sometimes reinforcements arrive and armies have to take what they can get. Often these reserves may be simply patrolling squads that happened to be in the area. Sometimes they are simply the only unit on duty when a distress call comes in.
Random Reserves are always followed by a number and a points value. The even number represents how many random rolls each army gets and the points value represents the maximum value each unit may have. A typical listing would be something like: "Random Reserves: 2@225" which indicates two reserve units at no more than 225 points each. Random Reserve units never apply toward the regular points value for the army list.
For each random reserve unit, roll 1D6 and use the following table to determine the type of unit the reserve may be:
- Troops
- Fast Attack
- HQ
- Heavy Support
- Elite
- Choose
Note that if the player does not have a qualifying unit of the type rolled available, for example due to recovery, subtract 1 from the roll until a qualifying unit is found. If a 1 was rolled and there are no qualifying Troop units, re-roll. If the result of a re-roll is one or no qualifying types can be found after a re-roll, no reserves are available for that player with that Random Reserve slot.
Example: A Mission lists Random Reserves 3@200. Player 1 rolls 1D6 and gets a 6. Choice! Player 1 selects a reserve unit of Troops and rolls his second slot. The D6 roll comes up 2 and he selects his last Fast Attack unit. On his third roll, Player 1 rolls a 3. He has no HQ units not in recovery or already on his army list so he subtracts one. He used his last Fast Attack choice on the previous roll, so he subtracts one again and gets Troops. His only remaining Troop unit is in heavy recovery and only has four models, not enough to field the unit. He loses his third Random Reserves spot and must make do with two.
Prologue
Gnoll Artanius snarled his black upper lip and ran a violently red tongue across wicked fangs. “Confound these pestilent Puppets,” he growled in an unnaturally low register. The puppets he referred to, the Imperial Sharks Chapter of the mighty Space Marines, had pursued Artanius' fleet halfway across the Segmentum. Their persistence was troubling, if not entirely unexpected.
“Sir?” a hollow, ethereal voice whispered from behind, distracting Artanius' attention from the amber glow of the console. Artanius said nothing, instead placing both of his massive hands on the grimy bulkhead over the console and cocking his head ever so slightly to the left. A pointed ear swiveled backwards, indicating he was listening, even if he was unwilling to completely acknowledge.
Lerdeth Rube, Artanius' highest ranking sorcerer lord, ran a gloved hand across his billowing skirt, smoothing it down. Rube turned a cool gaze from dead black eyes toward Artanius' attentive ear and suppressed a vindictive barb. There were plenty of eavesdropping troopers on the bridge this morning; no need to undermine the boss in front of them today. He would remind Artanius of his manners later, in a more suitable setting. After the pause had gone on long enough to become uncomfortable and Rube could sense Artanius' impatience getting gossamer thin, he spoke again. “Our position is secured; the Sharks have settled into orbit on the far side of Triste, just out of battery range. As anticipated they have already sent transports and dropships to the surface. Preliminary intelligence suggests they are mostly scouting platoons, and supplies for establishing fortifications have yet to be sent.” Rube paused. “I don't think they yet have a clue as to what our agenda is here.”
For a long moment, Artanius stood still, his folded leathery wings rising and falling with meditative breathing. Finally, he turned and raised himself up to full height.
The bridge of the Unhallowed Horde flagship Imprecation was massive, with the control consoles lined along the back wall and flanked on either side by massive 20-foot doors. From there central command stretched 100 yards forward, the primary workstations sunken several feet below the command bridge which extended halfway through the room. The forward wall stood eighty feet high, clear porticsene through which the mottled surface of Triste loomed large. Beyond the bloody red sun cast a rim of red glow over the planet's horizon. Even in this room, Artanius' size was imposing.
His wings spread slowly, stretching out and wrapping across broad shoulders clad in thick, impossibly heavy steel and iron. Beneath his wrapped wings, Artanius crossed his bulky arms over his barrel chest and craned his neck down to meet Rube's inky gaze. “And the Necron?” Artanius' voice rumbled through the bridge, drowning out the white noise of comm chatter, bridge crew busy work and the hum of machinery and electronic devices.
With a sardonic turn of his head, Rube ran a glove down his gilded faceplate. The tortured and twisted visage beneath crinkled into a mocking sneer. “Preliminary reports suggest ten thousand strong.” Rube paused dramatically. “Shall we proceed, m'lord?”
Artanius hissed, a ripple running down his wings that rattled the chains he had pinned along their ridges. “Watch yourself, Lerdeth,” Artanius said in a growl barely audible to human ears. His bowel-shaking roar was suddenly sharp in the minds of the peons closest to the confrontation a few steps below in the command trench. Artanius seemed like he was ready to say more, but thought better of it. Artanius and Rube held each other's eyes locked in silent struggle of dominance before Artanius finally drew his head up and cast an arrogant glance around the room. “Of course,” he said, “Send a regiment down to intercept the Emperor's Puppets as they land. Keep them occupied and send the engineers down to the pre-arranged coordinates to begin work immediately. The plan proceeds.”
Lerdeth Rube bowed low, helm nearly scraping the dingy plank below. Artanius turned and faced the console once more.
* * * * * * * * * *
Brother Gumaar gripped his brass Eagle's Ring and tried to ignore the bone-rattling turbulence of the drop. He had never known fear; he had fought in six hundred and eleven battles and wars by his count and never once had he felt frightened. As close as he ever got, even counting that time on Helt'ja with swarms of 'Nids closing in and his squad leader lying in three pieces in front of him, was when the dropships descended. Their barely controlled freefall was like being kicked out of a fighter at 20,000 feet wearing nothing but power armor. The morbid sense of humor drop pilots universally possessed never helped.
The pilot's voice crackled through the static of the comlink in Gumaar's helmet. “Liquid Touchdown in twenty-eight seconds,” he reported with that awful sense of self-aware and self-important irony. A Liquid Touchdown meant precisely the opposite of what it suggested: It meant they would be impacting with solid earth in less than twenty seconds. “Brace for impact,” clicked the Sergeant's helpful instructions. Gumaar gripped the Hubris Handles (another dropship pilot joke—har har) and wrenched on them as the deafening roar of the 'ship's landing spikes drove themselves into the surface and flexed, bowing the heavy bottom plate of the dropship into the ground at 600 kilometers per hour instead of 1,100. The foamulated crash padding sunk under the collective weight of a dozen suits of Power Armor and the lurching thud of finality sent Brother Gumaar's intestines into a temporary spiral. Stupid dropships, he thought.
Before his cursing of the blighted transportation mode could swing into full effect, Sergeant Kones was up and ratcheting the handle of the hatch open. A stream of reddish sunset light hit Gumaar's faceplate and his light rejusting visor darkened quickly, but not before Gumaar had to squint and blink back the spots on his vision. He took his place in line and marched off the dropship, falling only four feet to the ground and lining up with his fellow squad-mates along the eastern ridge of the dropship's crater. At least this pilot had managed to keep the ship more or less right side up. A lot of the drop jockeys thought it was hilarious to angle in so the Marines inside had to roll out from a skyward-facing hatch and drop something like thirty feet to the ground.
“Okay men,” the sergeant barked, shouldering his bolter, “We're about seventeen klicks from the rendezvous point—” The sergeant waited for the groans to dissipate. Maybe the dropship pilot wasn't so great after all. Brother Nolan leaned over and private commed Gumaar, “I say we drop a homing beacon right now and have them send a Rhino down for us.” Gumaar lifted his chin in a slight nod of affirmation. The sergeant's patience had worn through.
“We'll be mounting-up Rhino when we get to the RP, until then we double-time.” He seemed to cast a peculiarly pointed glance at Brother Nolan as he said this. Gumaar wondered if he had comm-tapped the squad. It wouldn't be the first time. The sergeant looked around with pursed lips. “Well? What are you waiting for? Move out!”
* * * * * * * * * *
As the red sun rose over the southern mountains, Sergeant Nabokov held up a clenched fist. The small valley below bustled with activity. The clear blue and black glimmer from the Imperial Sharks' armor swelled his chest with pride. Slipping his bolt pistol into the holster strapped low on his breastplate and snapping the latch, Nabokov turned and regarded his squadron, hands on hips in a wide-legged stance of authority. He held the pose for a moment, allowing the line of troops under his control to come to a perfect attention. He passed only his eyes across the men before him, slowly regarding each one. Wordlessly, he curled his hand into a three-fingered claw and brought it to his chest, snapping it down, pulling his elbow down toward his hip. “Essum todus!”
His regimen hesitated for a fraction of a second and then in perfect unison returned the gesture, breast to hip with a satisfying clap of armor. “Dentis Impereator!”
Nabokov clenched his jaw to suppress a smile. The effect was a bemused grimace that intensified his severe face, pockmarked and scarred. Devouring all. Teeth of the Emperor. His moment of pride was cut short as his comm crackled to life. “Chaos forces, approaching from the west! Scramble all surface forces. Commanders, report for battle orders immediately!”
* * * * * * * * * *
Arkeign strode his massive frame forward into the valley. Just past a hill crest off to the northwest his targeting sensors showed several squads of Sharks. A fresh tingle of brutal torment coursed across his ruined flesh, registering only as curious trivia to Arkeign's poisoned mind. He had come to associate the ghastly punishment his body endured without his conscious awareness as part of his personality. It was time for battle. Time for victory.
He glanced to his left, craning down to see Lieutenant Gratch, perched on a high rock and evaluating the troop formations of the enemy. Arkeign considered drawing a target on Gratch, seeing how well the shrill and demented little weasel handled a massive deluge of burning plasma or perhaps a violent snap from his six-foot claw. With a smirk he dismissed the notion. Gratch may be a pissant, but he was well-connected with Artanius and hardly worth the trouble. Arkeign snapped out of his thoughts as he presently felt Gratch's gaze. “Time for daydreaming, Arkeign?”
Arkeign didn't bother demeaning himself with a reply. Gratch ignored his silence. “Two Rhinos just ahead. See them? Those are your primary objectives. Focus your fire on them and see if you can't keep their occupants from breaking off and getting behind that ridge over there. We'll both move together until one or the other spits off. Then you'll take the one further out and I'll pull Rustbucket's fourteenth over to flank them. If you get into trouble, call Singulus for backup and wait until the ITI arrives with Gretchen.” Arkeign turned, bringing the full frame of his Dreadnought armor to bear on Gratch.
“If I get into trouble,” he spat as if the notion were ridiculous, “I won't have time to wait for Singulus. He's distracted by anything that moves.”
Gratch didn't flinch, and stared hard at Arkeign, ashen face a mask of contempt. A fresh trickle of blood began to flow from the corners of his mouth. “Singulus will back you up, should you need it. The ITI will be here in several hours at the most. They'll arrive via the road and will come to meet you down there, south of the hill. I trust that between the three of you a couple of Rhinos shouldn't be a problem?” Arkeign considered shooting Gratch for the second time in less than five minutes.
“No, sir. No problem at all.”
* * * * * * * * * *
Sergeant Nabokov wiped a gloveful of grease, blood and sweat from his brow and flicked his wrist toward the ground. He allowed himself another short moment of pride. The Unhallowed Horde. Pushovers, really. His thought process was cut short by a blast from an unseen lascannon burning overhead, disintegrating a grove of trees behind where his Rhino idled, acting as cover for his unit. The battle had started on a grim note. Field intelligence reported a Defiler striding in from the eastern edge of the valley seconds before it had scattered Brother Ricci's Dreadnought Armor across the valley floor. Ricci's body had been lifted behind the lines back toward the Rendezvous Point, but there would be no status report until after the battle.
Since then however, the Imperial Sharks had managed to rally behind Brother Ricci's sacrifice. Incisor squadron had surprised a gang of bikers, ambushing them with a perfectly executed jump landing; carving them to pieces. Tiger Squadron, nestled into a clearing on a southern ridge had used their heavy weapons to clear an entire platoon of advancing Chaos troops and even though the Mako Scout team's location had been compromised and they'd had to retreat from the high hill they'd managed to sneak forward onto, in spite of heavy initial losses they had regrouped and found a secure location close to Tiger Squadron.
Nabokov had heard an explosion from the other side of the forest a moment before, and assumed that since no support calls had come in since then it must have been another casualty for the Horde. Good riddance. Cursed heretics and their devious machinations. He wondered for what seemed like the millionth time what in the Emperor's name these foolish fallen were after on this backwoods rock. A sudden burst of comm chatter snapped the sergeant free of his thoughts, and he pulled his head up past the tread of the Rhino and squeezed off several shots at the advancing Dreadnought. It would be soon enough that the heretics would realize that they stood no chance against the Teeth of the Emperor and flee.
Sergeant Nabokov saw the blue-white mass of burning plasma half a second too late to grab the raw youngster hunched next to him and pull him out of the way, but he did leap back himself. It wasn't until the roar of static in his headset died away that he was able to look down and see his leg burning away beneath a puddle of melting slag.
* * * * * * * * * *
Singulus buzzed with fury. Gratch's bumbling had cost them the day and singulus was not one who took defeat lightly. Arrogant humans...
Without warning a static crackled through the air. It was subtle, reminiscent of the Warp. It might almost have been a welcome memory if it hadn't been so long since Singulus had felt such pure Warp-like energy. He diverted his attention momentarily from the raging battle in front of him to the valley edge to the south.
Singulus' fury drained in an instant. Warp-spawn know no fear. He had felt no sense of discomfort, unease or eerie apprehension in all his millennia of existence. Yet now, for the first time ever, Singulus hesitated. The lifeless eyes of scores of skeletal warriors bore down on him, emotionless, even lacking the raw animalism of the Tyranid swarms. The Great Devourer was fearsome, but at least they had a sort of savage intensity. These fleshless metal specters were as cavalier as a nobleman regarding his servant. Without realizing, Singulus' attention came to bear on the barrels of their oddly swirling weaponry, pointed directly at him. The pale greenish beams pulled Singulus apart and for a moment he felt he might actually be free once again. Then the tainted touch of Lerdeth Rube's Warp mastery came all too familiar once again, tugging at his essence and cramming him back into the melted husk of his prison.
Singulus collapsed and felt but did not see the Necrons passionless attention turn elsewhere.
* * * * * * * * * *
Brother Hannan let the recoil adjusters in his power armor absorb most of the shock of landing, the way he had been trained. He tried—mostly with success—to let the years of carnal warfare absorb the shock of the close proximity to these ghastly abominations. The gauss rifles were fitted with heavy axeblades below the barrels, and the edges looked sharp enough to bury into the few chinks power armor suits had but not quite sharp enough to cut bare flesh cleanly or without heavy, crushing agony. The hissing release of coolant from Brother Hannan's jump pack masked the sound of his power fist charging, a low whining electronic hum that increased steadily in pitch until it was just short of interfering with the audio circutry of his helm. Then the warbling, gyroscopic feel of the self-propelled fist replaced the noise and the weapon was ready to strike.
Hannan looked up in time to see his brethren already engaged with the seemingly endless rows of undead. Their bolt pistols tore metal femurs and tibula, roaring chainswords lopped vulgar steel skulls clean from their armored ribcages but still the Necrons pressed forward, cutting through their incapacitated allies in a mindless effort to reach the Marines.
The heavy vibration of a gauss rifle's axeblade striking the dirt inches from Hannan's left foot snapped his attention back to the melee. He wasn't sure where the four soulless that now surrounded him had come from, exactly, but he was sure where he was planning to send them. He nimbly sidestepped another ponderous attack but didn't anticipate a much faster blow from behind. Staggering forward, mentally running through his body checklist for injury, Hannan pulled the quickbooster latch on his jump pack and pressed down and quickly up with his legs, leaping perhaps nine feet over the advancing Necron, narrowly missing an eerily precise mid-swing adjustment from the gauss-axe.
The Necron may have quickly recovered from Hannan's evasive maneuver, but it did not quickly react to being attacked from a different direction and still stood with its back to Hannan as the Power Fist crushed its way through the metal torso. Brother Hannan twisted his arm palm toward the sky and flexed his considerable bicep, gripping the Necron warrior's skull-face by the dead eyesockets and lifting the entire creature off the ground. The overhand swinging motion sent the Necron headfirst into the rocky dust some five feet from where it had originally stood, gravity and velocity warping the armored spine upon impact and sending the free-falling hips and legs splintering through the lower jaw just below Hannan's wrist.
Without pausing to admire his handiwork, Hannan released the shattered pile of alien metal and used the power fist's locking coils to pull his fingers in tightly. He knew the other Necrons would have adjusted to his temporary lack of attention and would be moving in for the kill from behind. He swung in a wide arc, 180 degrees from the far edge of his field of vision to as far as his power armor's shoulder would let him extend. He felt one metallic clavicle give, saw a single Necron skull skitter across the ground as he spun. I have miscalculated; there should have been three impacts he thought calmly and without panic. The first blow came from behind, where he had been looking only seconds before. It crushed his jet pack into his back, bending him nearly double and sending him to his knees, head thrown back and filling his vision for a moment with the purple sky then only pure white light.
The second blow landed just below the adam's apple, with the heavy but not quite sharp enough blade angled up past his shoulders.
* * * * * * * * * *
Artanius had destroyed hundreds of bits of equipment on the various ships he had commanded. His lack of patience for failure was legendary, his most visible outward sign of frustration equally so. He had learned, at least, to aim for non-critical systems first and now as his black-skinned fist buried itself into the control module for the secondary life-sensors the crew of the Imprecation's bridge breathed a sigh of relief that it wasn't anything important this time. Artanius swore in the gutteral language of Warpspawn: A litany of heretical curses so vile that human ears could not comprehend them nor even hear them in most cases. Those unfortunate few who sought the hate-oaths of the damned found only madness and death for their trouble.
“Useless imbeciles!” Artanius roared. His daemon-weapon, a swirling crystal-like blade containing Warp denziens struggling for escape and hungry for more souls, rippled sickeningly and let loose a low hum from its sheath along Artanius' spine, slung at a sharp angle between his wings. Whipping around, fury burning in his white hot eyes, he pointed a curved claw at the comm operator. “Get Lieutenant Gratch on the comm this instant!” he bellowed. The uncomfortable few seconds it took to establish the link seemed to last an eternity. Finally Gratch's gurgly, liquid screech cut through the slience.
“Lord, we've sustained heavy losses! I'm ordering a retreat! The Necrons arrived and we've lost Singulus! Oh Tzeentch—” Gratch's transmission ended with a blast of static-distorted bolter fire and the tinny ring of stormbolter fire burying itself into iron. Artanius stood, chest heaving, powerful jaw clenching and bulging from a black cheek. Fresh amber daemon-blood flowed from new lacerations on his lips and chin from his fangs. The bridge crew stood in tense anticipation of the coming storm.
Instead, Artanius drew one last hissing breath and closed his eyes for a long moment. Finally he spoke in a calm baritone. “Order the retreat. Tell the salvage crew to retrieve Singulus and summon Lord Rube to the landing site so that he may assist with the binding and reconstruction of Master Singulus' carapace.” He let the orders hang in the air for a few heartbeats. “And get me a status report on the construction. I want that fortification completed within the next forty-eight hours.”
* * * * * * * * * *
Master Librarian Dimitri spat a gritty mix of smoke, dust and blood into the crater's side. As he reached the edge he buried a heavy boot into the ruined earth to stabilize his position and indulged himself in a brief glance over his shoulder. The Rhinos were close to the western edge of the valley and holding there, waiting for his orders. In the distance, to the south, he no longer heard the chaotic mania of battle and feared the worst for Shallowfin.
At last he forced himself to look ahead. The gleaming silver Monolith rose high above the forest trees, the setting sun behind him casting its wine-colored light across the mobile dark temple's surface, making it look bloody. The towering power crystal at the Monolith's apex throbbed from within and the surface of the structure shifted in a perception-warping shimmer that sent Dimitri's bowels into a lurch.
More presently, the line of Immortals marched forward, only a few yards out now. Dimitri steeled himself and dropped his power axe into its loop on his hip. May the Emperor protect him now, as ever. He closed his eyes and opened his mind to the Training, feeling the pull of the Warp as he molded the power there to his own divine purpose. A yellow glow enveloped him, he was blissfully unaware of the hissing gauss blasts sizzling past him on all sides, melting the dirt in front of him.
At once the Necrons charged, running with disturbing grace on skeletal legs, rasing their mammoth weapons above their lifeless heads to deliver the final blows.
And then Dimitri was ready. His eyes snapped open, pupil and iris replaced with burning warp fire, hands cupped in a gesture of pennance, glory and triumph. His mouth twisted into the grin of the mad and he thrust his hands toward the rushing tide of horrors. There was no blast, no vapor, no smoke. Only a light, a blinding disc of nothing that opened before the rushing Necron and as they stepped in, near or on the disc it blinked away, like a console monitor snapped off, residual light burning into fields of vision and half the number of Necrons were simply gone.
* * * * * * * * * *
High above Triste's surface, the flagship Leviathan hovered, and Commander Sutter stood At Ease, hands folded behind the small of his back. His forces below were represented by tiny dots on a topographical grid, approximated and operating on a fifteen-minute delay from field reports and overhead scans. War had been so much simpler when he was a young man, strapping on his power armor and slapping a clip into a hand-me-down bolter.
A new refresh washed the screen clean and relocated the positions of the blips to various spots on the grid. Some did not reappear at all. A young communications operator rose from his seat and approached with a datapad. “Sir, ops report and field intelligence suggest that given the amount of light left we could push the Necron forces back. But we need to redeploy the Rhinos immediately into flanking formation.”
Commander Sutter heard the officer but did not reply. After a long pause the young man began to shift uncomfortably and Sutter finally reached a hand out, economy of motion, accepted the datapad without ever making eye contact and gave the smallest perceptable nod. The operator seemed to accept that this relived him of duty and returned to his post.
Sutter awaited another refresh of the screen. It seemed that more of the blue blips were missing than green. That was a good sign. A whiff of sweat from over his shoulder alerted him to a new presence. “Sir? We need your orders now. The Rhinos should break their hold as soon as—” Sutter cut him off.
“No,” he said quietly, voice still rasping with age. The vile daemon and his traitorous legion had been pressed back; perhaps they would have been destroyed if the Necron had not appeared. Still, there was no sense in sending men back into the battle against those murderous ghouls. Today's objective had been achieved, if a bit sloppily. Perhaps that had not been their fault entirely. Necrons were so damnably unpredictable. “Issue the withdraw order. Tell them to regroup in the foothills sixteen klicks south of the drop zone.” Sutter paused and finally looked at the officer, an older man but still strong and fit. It was his liquid brown eyes that betrayed his age. “And tell those men they did one hell of a job out there today. One hell of a job.”
* * * * * * * * * *
In the high mountains above the valley floor, a cold presence passed through a cleft in the rock formations, turning unearthly eyes at the carnage below, watching the blue and black tanks pull away from the lecherous advance of the skeletal beings. The thin grey skin tightened around the somehow insubstantial visage, rippling in a curious and unsettling way. An unnamed mammal ventured too close and suddenly hopped into the air, squealing with discomfort and sprinted away. With a small gesture, a twitch of the fingers, the Necron army stopped its advance, pausing for a moment before turning and filing back to the towering monolith, shimmering gold in the fading light.
A breathy hiss remained behind as the presence retreated away. “Success...”
Mission 200502-000: So Much For the Welcome Wagon
- Game Type: Seek & Destroy
- Scenario Special Rules: Dusk & Dawn, Divided Force (Necrons), Victory Points
- Points:
- Space Marines: 1,250 (250+ Reserve)
- Chaos Marines: 1,250 (250+ Reserve)
- Necron: 1,750 (All Reserve)
- Game Length: 6 Turns
- Winner: Victory Points
- Deployment: The Active part of the Necron force will deploy on the short edge of the Necron player's choice, the Passive part will deploy behind one of the opposing forces. The player who deployed from that edge may make a 4+ roll to pinch the flanking maneuver and force the Passive Necrons to deploy from the other short edge.
As each side prepares their bases on the planet surface, contingency forces are sent to keep the others occupied. Chaos Marines and Space Marines clash over a wooded area. The battle escalates as Necron forces begin piling in to ward off the invading armies.
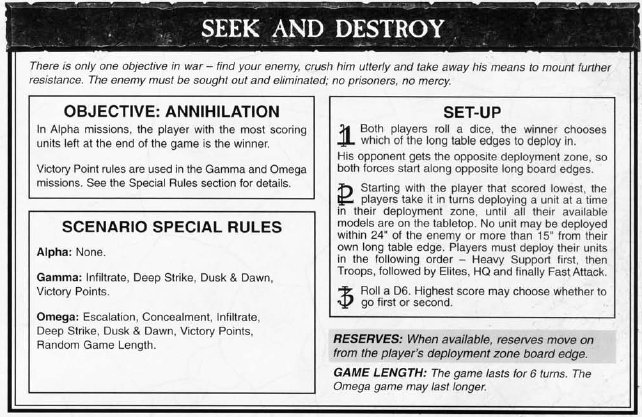
Chapter 1: Home Away From Home
Arkeign dropped to a heavy, mechanical knee, leaving a deep impression in the dry, cracked earth below. Gauss flares scalded the air around his Dreadnought armor, vaporising trees and stripping rocks into smooth glass.
Mission 200502-001a: Escalator
- Game Type: Cleanse
- Scenario Special Rules: Escalation, Random Game Length, Objective Phase Out, Victory Points
- Points:
- Space Marines: 1,500 (1,000 Reserve)
- Necrons: 1,500 (800 Reserve)
- Game Length: 6 Turns/Variable
- Winner: Victory Points
- Rewards: If the Space Marines win the mission they may establish their base and receive the Campaign Honor Base of Operations.
The Space Marines patrol the area, locating a good spot to build their base. They call for reinforcements to secure the area as a Necron advance sweep squad locates the intruders and engages, signaling for support. As both armies reserves arrive, the struggle to maintain the hill intensifies.

Mission 200502-001b: The Gathering
- Game Type: Secure and Control
- Scenario Special Rules: Concealment, Random Game Length, Infiltrate, Deep Strike, Victory Points
- Points:
- Chaos Space Marines: 1,500
- Space Marines: 1,500
- Game Length: 6 Turns/Variable
- Winner: Victory Points
- Rewards: If the Chaos Space Marines win the mission they may establish their base and receive the Campaign Honor Base of Operations.
A Chaos transport ship carrying Warp Coils necessary to establish a connection for Chaos Daemon forces and Psykers has been downed. Construction of the Chaos base cannot proceed without the Coils, but the transport ship was destroyed by orbital fire from the Space Marine Chapter Ships. Retrieval teams from both armies are sent to retrieve the six Coils and they arrive on location to secure the artifacts.
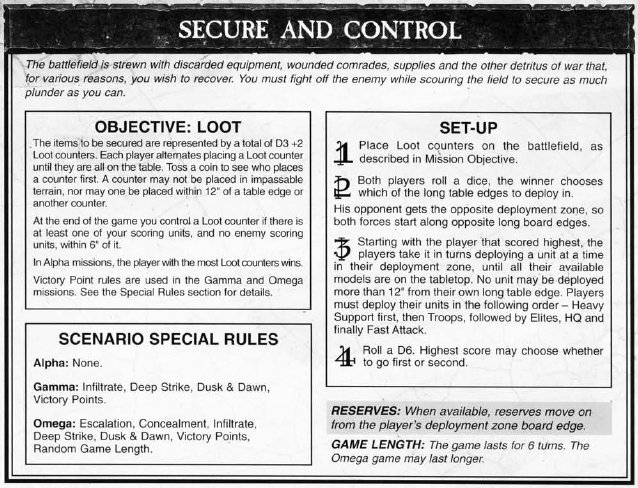
Mission 200502-001c: Crypt Kickers
- Game Type: Take and Hold
- Scenario Special Rules: Reserves, Objective Phase Out, Random Game Length, Deep Strike, Victory Points
- Points:
- Necrons: 1,500
- Chaos Space Marines: 1,500
- Game Length: 6 Turns/Variable
- Winner: Victory Points
- Rewards: If the Necrons win the mission they may establish their base and receive the Campaign Honor Base of Operations.
- Reserves: Reserves move in from the short table edge 90 degrees to the right of the deployment edge.
The Necrons have buried a deep space homing beacon into a hillside to transmit valuable data and news to their home tomb world several parsecs out. The Chaos Marines have located the supposedly secret beacon and are desperate to capture it for some reason. As the Necrons note the approaching Chaos forces, they dispatch their own defensive units to hold off the approaching Horde.
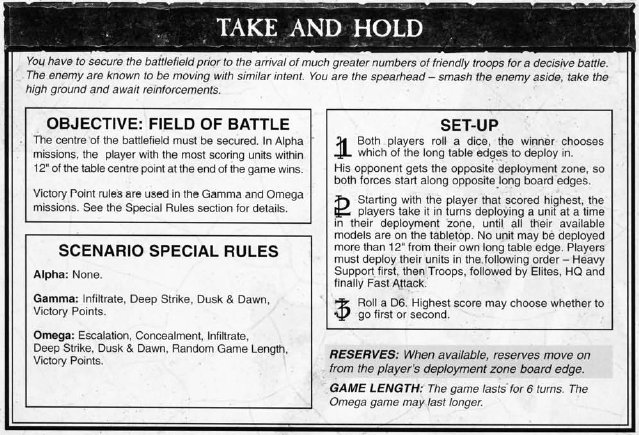
Chapter 2: Just What Exactly Are We Doing Here?
Mission 200502-002a: Grim Questions
- Game Type: Ambush
- Scenario Special Rules: Random Game Length, Objective Phase Out, Hidden Set-Up, Concealment, Reserves, Third Parties, Infiltrate, Automatic Dawn (Turn 1 is Night Fighting), Victory Points
- Points:
- Necrons: 1,000
- Space Marines: 1,250
- Game Length: 6 Turns/Variable
- Winner: Victory Points
- Terrain: The ambush location should feature high ground on either side of the Necron's deployment zone to reflect the canyon setting and a large forest or ruined city partially impeding the escape route.
- Special Instructions: The Necron force may not choose Monoliths during this mission. The Space Marines would never attack a force protected by such a monostrosity, even if they had the tactical upper hand otherwise. A modifier to the Ambush scenario rules: The defending force (Necrons) must move at least 25% of their force off the board edge (escaping) to qualify for the special double Victory Points reward for destroying opposing units. If less than 25% of the Necron force escapes, Victory Points for units are as normal.
Determined to find out more information about Chaos' and Necrons' motives on Triste, the Space Marines receive intel that a Necron force is on the move, sweeping an area. The Space Marines set a bold plan to ambush the Necron patrol and capture enough Necrons to allow their Inquisitors to find some answers.
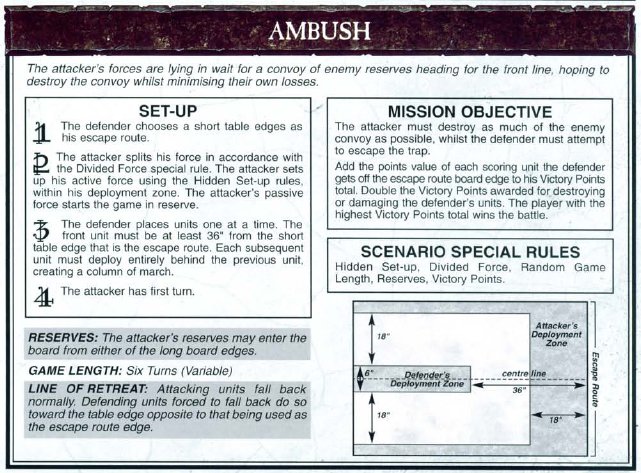
Mission 200502-002b: Vile Answers
- Game Type: Ambush
- Scenario Special Rules: Random Game Length, Hidden Set-Up, Divided Force, Reserves, Third Parties, Victory Points
- Points:
- Chaos Marines: 1,000
- Space Marines: 900
- Game Length: 6 Turns/Variable
- Winner: Victory Points
- Terrain:
Determined to find out more information about Chaos' and Necrons' motives on Triste, the Space Marines receive intel that a Chaos force is on the move, trying to transport munitions and excavation equipment from their base of operations to an undetermined location. The Space Marines set a bold plan to ambush the Chaos Transport line and capture enough of the heretics to allow their Inquisitors to find some answers.
Mission 200502-002c: An Unholy Pact
- Game Type: Blitz
- Scenario Special Rules: Deep Strike, Fortifications, Hidden Set-Up, Infiltrate, Obstacles, Preliminary Bombardment, Third Parties, Reserves
- Force Organization: The Chaos Marines must include Gnoll Artanius as an HQ choice. If Gnoll Artanius is not available due to Recovery Rules, he may be used anyway but his points cost is doubled.
- Points:
- Chaos Marines: 1,250
- Necrons: 1,250
- Game Length: 6 Turns
- Winner: Objective – Gnoll Artanius must survive. Gnoll Artanius must reach the Second Line, as must at least one scoring unit for the Chaos forces to win. If Gnoll Artanius reaches the Second Line but no scoring unit does, the mission is counted as a Marginal Victory for the Necrons and Chaos may Press.
- Rewards: The winner of this mission acts as the Primary during Mission 200502-003. If the Chaos Marines win, they gain Negotiations.
- Terrain:
Frustrated by the Space Marines' meddling, Artanius plots to present the Necron forces with a temporary truce: Join forces to crush the False Imperial pests. Necron warriors have no concept of diplomacy however, and Artanius must puncture a Necron stronghold with a squad of bodyguards to safely present his offer to the Necron Lords.
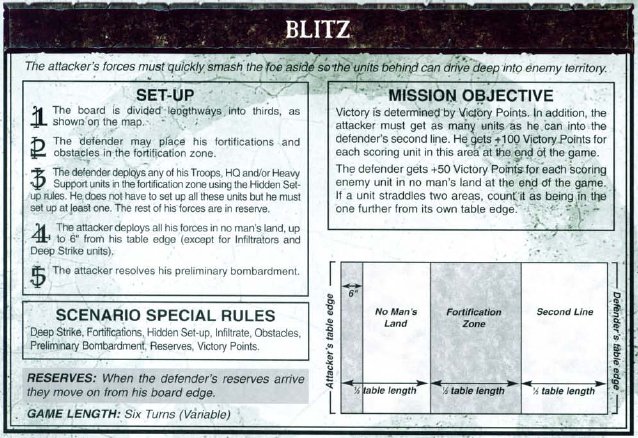
Chapter 3: Sorry I Asked
Mission 200502-003: Pride Before the Fall
- Game Type: Breakout
- Scenario Special Rules: None
- Force Organization: Defenders may not select more than one Heavy Support unit. They may field one additional Troops unit and their choice of either a second additional Troops unit or an Elite unit instead.
- Points:
- Primary Defender (Winner from Mission 200502-002c): 1,200
- Secondary Defender: 800
- Space Marines: 2,000
- Game Length: 6 Turns
- Winner: Objective – The Space Marines must get more than half of his units off the board in order to claim victory. If the Space Marines fail, the remaining Defenders will play an additional D6+2 Turns to a maximum of 6 using standard Victory Points to determine the winner.
- Rewards: Every Space Marines unit that leaves the table via a short table edge gains +100 Experience Points.
- Terrain:
Gnoll Artanius' arrogance has led him to try and negotiate with the Necron Lords. However, the Necrons do not negotiate with cattle and no agreement was ever fielded. Despite the fact that Artanius was never even able to deliver his proposal, the C'Tan have decided to entertain Artanius' scheme anyway. The Primary in this mission will choose which Defender Zone to deploy into and will always go first.
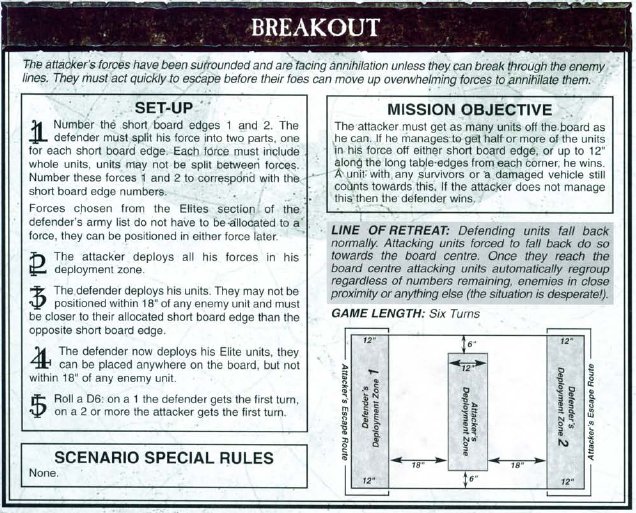
Chapter 4: Internal Conflict
Mission 200502-004: White Knuckled Fury
- Game Type: Cleanse
- Scenario Special Rules: Infiltrate, Deep Strike, Random Game Length, Victory Points
- Points:
- Necrons: 1,100
- Chaos Marines: 1,100
- Game Length: 6 Turns
- Winner: Victory Points
- Terrain:
Furious at the Necrons' meddling betrayal in the Chaos plot to decimate their Space Marine foes without even bothering to extend a passive ear to his original scheme, Artanius launches an attack on Necron forces, also eager to locate the Necron Stasis Tomb he believes is nearby.
If the Chaos Marines win, play Mission 200502-005c: Wake the Dead. If the Necrons win, the next Chaos/Necron mission is 200502-006c: Ritual, Interrupted.
Chapter 5: The Emperor Strikes Back
Mission 200502-005a: Rise and Shine
- Game Type: Hold At All Costs
- Scenario Special Rules: Reserves, Infiltrate, Deep Strike, Random Game Length, Night Fighting, Dawn (Turns 6+ in the mission will not use Night Fighting), Hit 'Em Hard
- Force Organization: Chaos: 1 HQ*, 1 Elite, 6 Troops*, 1 Fast Attack, 4 Heavy Support*. Space Marines: 2 HQ*, 3 Elite*, 5 Troops, 3 Fast Attack, 1 Heavy Support.
- Points:
- Space Marines: 1,200
- Chaos Marines: 1,200
- Game Length: 6 Turns/Variable
- Winner: The objective in this mission is a token representing the Orbital Scans.
- Rewards: If Chaos wins they receive Standard Issue Recoil Suppressors. If the Space Marines win they receive Opposition Insight. The winning player is also the Primary in Mission 200502-006a: The Scans Are the Plans.
- Terrain:
$SPACEMARINES_COMMANDER, frustrated by what he believes is an unprecedented alliance between the Necrons and the Chaos forces, receives word from his scouts that the Chaos forces are transporting several heavy weapons and supplies from a drop point several klicks away from their established base. Hoping to interrupt their reinforcements and perhaps capture a few soldiers alive for questioning as to the Chaos agenda on Triste, he draws up a clever nighttime assault of the convoy.
What $SPACEMARINES_COMMANDER doesn't know is that the convoy is transporting more than just supplies and repaired equipment, they also have the latest orbital scans of the planet surface with annotated intelligence, a pivotal key to the Chaos schemes. They will defend these to the death.
Each * indicates a required unit of that type.
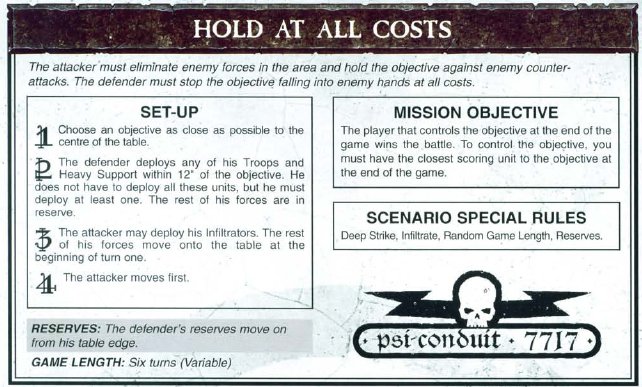
Mission 200502-005b: Burning For You
- Game Type: Recon
- Scenario Special Rules: Infiltrate, Deep Strike, Dusk & Dawn, Flammable Terrain, Victory Points
- Points:
- Space Marines: 700
- Necrons: 700
- Game Length: 5 Turns
- Winner: Victory Points.
- Rewards: The winner of this mission acts as the Primary in Mission 200502-006b: Blinded by the Light
- Terrain: Wooded area terrain.
The Imperial Sharks Space Marines have located some nearby Necron activity. In an effort to learn more about them, the Space Marines deploy a small recon force to penetrate through a parched forest to gather intel on the Necron forces. But the Necrons want information of their own...
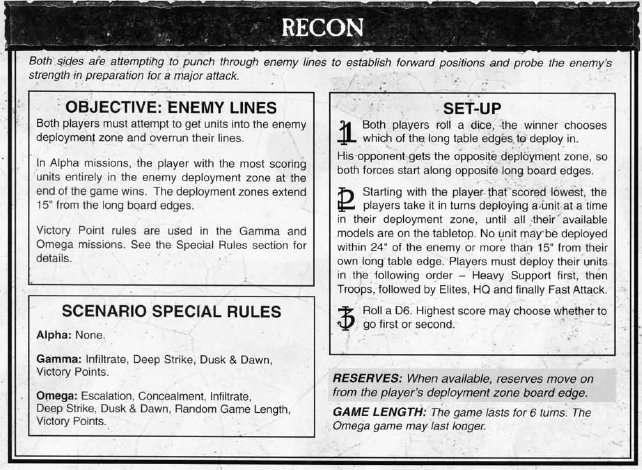
Mission 200502-005c: Wake the Dead
- Game Type: Sabotage
- Scenario Special Rules: Infiltrate, Random Game Length, Reserves, Sentries, Third Parties, Objective Phase Out
- Points:
- Chaos Marines: 1,000
- Necrons: 1,000
- Game Length: 6 Turns/Variable
- Winner: Objective
- Rewards: If a Chaos unit destroys the objective, that unit gains +100 Experience Points. The winner of this mission acts as the Primary in Mission 200502-006c: I Loathe the Undead
- Terrain:
The Chaos forces have located the Necron Stasis Tomb; a mobile structure which provides some of the technology the Necrons use to phase in their most valuable resources. The Necron forces may not use Monoliths or $NECRON_COMMANDER in this mission and no Chaos forces may use Deep Strike or Infiltrate (they may have the abilities, they just may not use them).
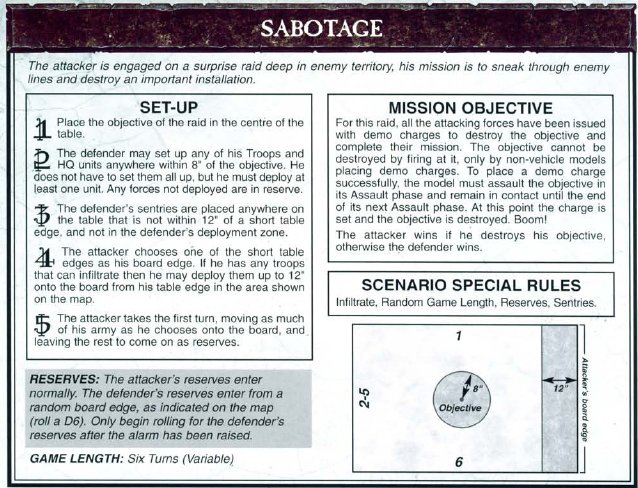
Chapter 6: A Valuable Find
Mission 200502-006a: The Scans are the Plans (Kill-Team)
- Game Type: Kill Team Reconnoitre
- Participants: Chaos Marines, Space Marines
- Rewards: If the Kill Team is successful, the Kill Team player may choose to either play Mission 200502-007a: In the Cold, Cold Night as Kill Team or 200502-007b: Leave Nothing to Chance as Primary. If the Kill Team Fails, the next Chaos/Space Marines mission depends upon which team ended up with the orbital scans in their possession. If the Chaos Marines possess the scans, the next mission is 200502-010a: Something Wicked This Way Comes. If the Space Marines possess the scans, the next mission is 200502-010b: Hell Beckons the Heretics.
- Terrain: Must include the secondary's Base Board with the base area located as near to the center as possible.
The Primary (Brute Squad) of this mission has possession of the Chaos orbital scans and has escaped with them back to their base. The Secondary (Kill Team) must now send in an advance recon squad to locate the plans so the army can plan a retrieval scenario.
Mission 200502-006b: Blinded by the Light (Kill-Team)
- Game Type: Kill Team Assassination
- Participants: Necrons, Space Marines
- Rewards: If the Kill Team is successful and the target was not a decoy, the Kill Team player is the Primary in Mission 200502-008a: Strike While the Iron is Hot and the Secondary's Army Commander will be subject to Recovery for that mission (even if it would otherwise not be). If the target was a decoy, play 200502-008b: Second Time's a Charm as Kill Team. If the Brute Squad is successful, play Mission 200502-008c: Vengeance is Mine with the Brute Squad player as Primary.
- Terrain: Must include the secondary's Base Board with the base area located as near to the center as possible.
The Primary (Kill Team) of this mission has learned the location of the Secondary's base and is sending a small team of assassins in to decapitate the force by killing what they believe is the commander of the enemy forces. Before the mission begins, roll 1D6. If the result is a 1 or a 6, the target is the army commander, who should be modeled appropriately although he/it will act as the profile indicates on pg. 220 of the WH40K rulebook for the sake of this mission (the commander is caught sleeping or in the bathroom or in stasis...). Otherwise the target is a decoy (either way the profile listed for the target still applies, although decoys may be modeled differently).
Mission 200502-006c: I Loathe the Undead (Kill-Team)
- Game Type: Kill Team Sabotage (Modified, below)/Escape
- Participants: Chaos Marines, Necrons
- Rewards: If the Kill Team is successful in the Sabotage portion of the mission, the Kill Team player is Primary in Mission 200502-009a: Bad Day to Stay Home and receives an opportunity for the Coordinated Attack during that mission. If the Kill Team is also successful during the Escape portion of the mission, the KT player receives one extra Specialist Kit choice during its next KT mission and receives a re-roll during the Coordinated Attack for each member of the Kill Team that survived the escape attempt. If the Kill Team Fails the Sabotage portion of the mission, the Secondary (Brute Squad) player receives Base of Operations and plays as Primary in Mission 200502-009b: Intercepted.
- Terrain: Must include the secondary's Base Board with the base area located as near to the center as possible.
The Primary (Kill Team) of this mission is attempting to infiltrate their opponent's base and plant remote-detonated mines on the base's fortifications. Before the game begins, set 2D6+1 markers or counters around the Secondary's base area (the Primary player should make this roll). Take turns or make agreements as to where these markers should be placed, but do not place any two markers closer than 4" to each other. These locations should be key spots such as bunkers, wall joints, razor-wire nests, foxholes, access roads, etc. The Kill Team's objective is to their mines at these key locations. For the most part this mission works like the KT Sabotage mission (pg. 239) except that setting the mines works like the Hit and Run objective where one model must touch the marker for a full turn to set the mine.
During this turn, the model is considered to be discreetly arming a mine and cannot be seen by any Brute Squad that is not Aware (spotting range for that model is considered 0" or base-to-base only). Even Aware units may not fire upon an arming KT model in the shooting phase, but may assault the model if they are within the Aware Brute Squad's spotting range. Arming models do not have to remain within unit cohesion with the rest of their Kill Team; this represents the Kill Team splitting up to arm more mines at the same time. After the arming turn is over, models which have lost cohesion due to arming may make a 2D6" consolidation move before the unit's regular move, although if it reaches coherency range by doing this the entire unit counts as having moved (even if once consolidated they do not take their normal 6" move) and the re-joining model may not be moved to a marker that turn. Specifically, a model may not take an Arming Turn, use the consolidation move, and then begin arming a new mine. A different model (which would have moved a maximum of 6" that turn) may begin an Arming Turn as normal, of course.
Once at least three mines have been armed, the Primary is considered to have successfully completed the Sabotage portion of the mission. The Kill Team player may then choose to either continue arming mines (up to the maximum number of plant site markers) or initiate the Escape sequence. Escape is played from the beginning of the Kill Team player's turn in which he declares the escape. Immediately all remaining Kill Team models must move into coherency with the model that is the closest to the center of the table and not within spotting range of a Brute Squad. If no models or unit portions are outside of Brute Squad spotting range, the entire Kill Team rendezvous at the center of the table.
At the beginning of the Brute Squad player's turn after the Escape sequence has begun, the Brute Squad receives one free Klaxon Counter.
Chapter 7: I Don't Like All This Sneaking Around
Mission 200502-007a: In the Cold, Cold Night (Kill-Team)
- Game Type: Kill Team Hit and Run
- Participants: Chaos Marines, Space Marines
- Scenario Special Rules: The Brute Player automatically starts with 45 points for Specialist Kit and either 20 Boss Points or one starting Klaxon Counter, due to the sensitive nature of the object being protected.
- Rewards: If the Kill Team is successful, the Kill Team army now possesses the orbital scans and receives Opposition Insight. The scans provide the force with enough intel to mount an effective assault on the opponent's base. If the Chaos Marines possess the scans, the next mission is 200502-010a: Something Wicked This Way Comes. If the Space Marines possess the scans, the next mission is 200502-010b: Hell Beckons the Heretics.
- Terrain: Must include the secondary's Base Board with the base area located as near to the center as possible.
The Kill Team force has decided to retrieve the orbital scans through stealthy insertion of a small strike force to escape with the scans before the alarm can be raised.
Mission 200502-007b: Leave Nothing to Chance
- Game Type: Bunker Assault
- Participants: Chaos Marines, Space Marines
- Scenario Special Rules: Fortifications, Infiltrate, Reserves, Victory Points, Third Parties
- Points:
- Primary: 1,300
- Secondary: 1,450
- Game Length: 6 Turns
- Winner: Objective: Before the match, the Secondary player must mark three locations within his base as Bunkers or potential locations of the scans as numbers 1, 2 and 3. The secondary player then rolls a D3, marking the bunker which corresponds to the resulting number as the target with the scans. The Primary player then rolls a D6 with no possible re-roll. If the result is a 5+, remove all markers from the bunkers which do not contain the scans. On a roll of 2–4, remove one marker from a bunker which does not contain the scans. If the Primary player rolls a 1, leave all bunkers marked. For the Primary to win they must have the bunker which contains the scans captured at the end of the game.
- Rewards: Every scoring unit occupying an uncontested bunker at the end of the battle gains +100 Experience Points. If the Primary is successful, that army now possesses the orbital scans and receives Opposition Insight. The scans provide the force with enough intel to mount an effective assault on the opponent's base. If the Chaos Marines possess the scans, the next mission is 200502-010a: Something Wicked This Way Comes. If the Space Marines possess the scans, the next mission is 200502-010b: Hell Beckons the Heretics.
- Terrain: Must include the secondary's Base Board with the base area located as near to the center as possible.
The Primary force has decided to retrieve the orbital scans by punching through the enemy's forces and looting their base.
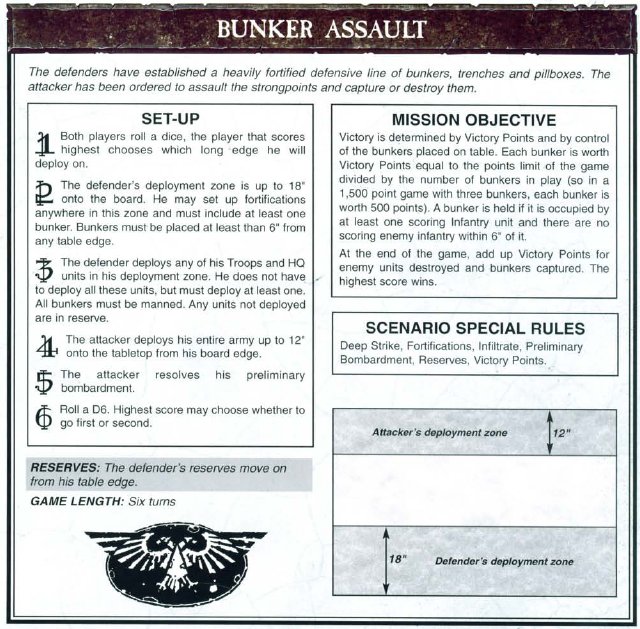
Chapter 8: Fruits of Our Labor
Mission 200502-008a: Strike While the Iron is Hot
- Game Type: Hold at all Costs (pg. 214)
- Scenario Special Rules: Deep Strike, Infiltrate, Random Game Length, Reserves, Objective Phase Out
- Points:
- Space Marines: 2,000
- Necrons: 2,000
- Scenario Special Rules: The Secondary in this mission has just had their Army Commander targeted with an assassination attempt. While surgeons/psykers work to restore or revive the commander, he is in Recovery for this mission and may not be chosen. Additionally, the army has suffered a morale-crushing blow and all Leadership will be -1 for the duration of the mission.
- Rewards: The winner of this mission receives Rallying Victory. If the Secondary player loses the mission, they lose all Base of Operations Campaign Honors, if they have any.
- Terrain: Must include the secondary's Base Board with the base area located as near to the center as possible.
With their opponent's leader down, the Primary forces launch an all-out assault against their foes' base in an attempt to drive them off of Triste for good.
Mission 200502-008b: Second Time's a Charm (Kill Team)
- Game Type: Kill Team Assassinate li>Participants: Necrons, Space Marines
- Rewards: If the Kill Team is successful, roll 1D6. The result is the number of missions the Brute Squad's commander must spend in recovery. If the Brute Squad is successful, play Mission 200502-008c: Vengeance is Mine with the Brute Squad player as Primary. The winner receives one roll on the Mission Rewards Table.
- Terrain: Must include the secondary's Base Board with the base area located as near to the center as possible.
The Primary (Kill Team) of this mission has assassinated a decoy instead of their original target. They are being re-inserted to finish the job, but this time the opponent commander knows that someone is after his life...
The target commander will be identical to the target profile listed on page 239, except that it will have all of its normal Wounds and a 4+ Armor Save (protective equipment)/6+ Invulnerable Save. The Brute Squad player will start with one Klaxon Counter.
Mission 200502-008c: Vengeance is Mine
- Game Type: Night Fight
- Scenario Special Rules: Night Fighting, Infiltrate Dusk & Dawn, Victory Points
- Points:
- Necrons: 2,000
- Space Marines: 2,000
- Game Length: 6 Turns.
- Winner: Victory Points
- Terrain:
Furious at the attempt(s) on their commander's life, the Primary forces launch a retribution attack at dusk to crush the opponent's will to fight.
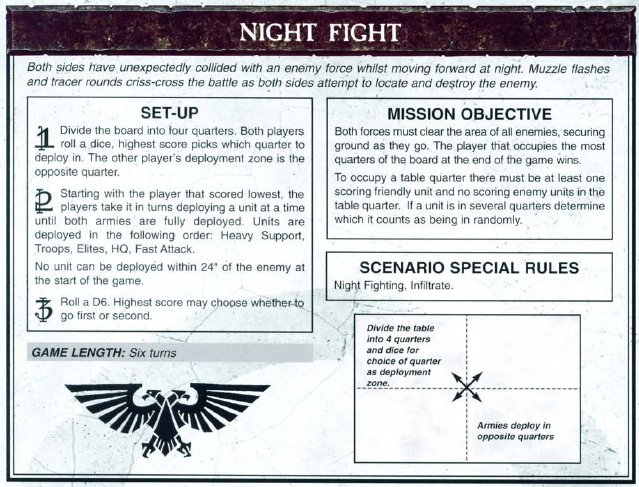
Chapter 9: Home Invasion
Mission 200502-009a: Bad Day to Stay Home
- Game Type: Meat Grinder/Strongpoint Attack
- Scenario Special Rules: Fortifications, Deep Strike, Infiltrate, Sustained Attack (Variant, below), Dusk & Dawn, Random Game Length, Coordinated Attack (below)
- Points:
- Chaos Marines: 2,000
- Necrons: 2,000
- Game Length: 6 Turns/Variable.
- Winner: Objective
- Rewards: If the Primary (attacker) wins, they also receive Rallying Victory, if the Secondary wins, they receive Base of Operations. Every surviving unit on the winning side gains +150 XP. A unit brought back on the table under the Sustained Attack special rule loses 50% of its XP for each time it was redeployed. If the Primary player loses, they gain no Experience Points at all.
- Terrain: This board should be 4' x 9' (3 2x3 boards long, two wide). Must include the Secondary's Base Board with the base area located along the long board edge in the center.
The primary player has set up a full-frontal assault on the opponent's base to be coordinated with the remote detonation of the mines planted by the Kill Team.
This match is a blend of the Meat Grinder/Strongpoint Attack scenarios. Use the deployment zones from the Strongpoint Attack, but the Mission Objective is the same as Meat Grinder: The Primary must destroy (or force a fighting withdrawal) the opposing forces within the number of turns allowed. The following special rules also apply:
Sustained Attack variant: This rule works exactly like the Sustained Attack special rule listed on pg. 193, except that any unit which is reduced to 25% or less during the Secondary's turn may not redeploy and are counted as completely annihilated for the sake of recovery and Experience. Units reduced to between 50% and 25% during the Secondary's turn may redeploy as listed in the Sustained Attack rules.
Coordinated Attack: After deployment but before the first Turn, for each mine that was successfully planted during Mission 200502-006c: I Loathe the Undead, roll 1D6. On a roll of a 6, the mine detonates successfully and was planted properly for maximum impact. For each roll of 5 the mine detonates but was not properly placed for maximum effect: These rolls cannot be re-rolled. Rolls of 4 or lower may be re-rolled using the re-rolls earned from escaping Kill Team members.
The range of each mine is 1D6+2" in a circle, but the blast will not pass through walls. Any units caught within a single mine blast range will suffer D6 Wounds (normal saves apply). Units caught within 2-3 blast ranges will suffer D6 Wounds plus one for each additional blast range. Units caught within 4 or more blast ranges will suffer D6 Wounds with no armor save possible plus one additional wound for each additional blast range beyond 4. Also, units with a model closer than 1" to a mine will suffer D6 Wounds which cannot be saved. For example, a unit of Chaos Space Marines is deployed into a courtyard surrounded by four buildings. Each building has a mine attached to it, plus the road leading into the courtyard has a mine planted there as well. With re-rolls, the Necron player manages to get all 5 mines to detonate and catch the CSM unit within range. The Chaos player must take D6+1 Wounds without possibility of an Armor Save.
Mines that detonated with a roll of 5 affect the deployed units as normal, but mines that detonated on a roll of 6 will also impact the structure or area they were planted on as well. Any building, terrain bit or wall which is impacted in this way will automatically lose 2 cover save levels. So a fortified bunker which is hit with a successful mine detonation will provide 5+ cover instead of 3+. Additionally, if the range of the detonation (as determined for deployed unit effect) covers more than half of a structure (determine with the agreement of the Secondary player), the structure is reduced to low rubble and any units deployed inside the structure must make a 3+ save versus instant death (no additional Armor Save or We'll Be Back roll possible). Walls will lose two cover save levels (down to 6+) for the span of the wall equal to the range of the blast. Roads will be given craters with a diameter of the blast range which count as 4+ cover but will force dangerous terrain checks for all units attempting to cross it. Base armaments suffering mine attacks will be destroyed and may not be used for the remainder of the campaign. If a mine is detonated in this way on the base's power supply, no armaments may be used during this mission. Razor-wire or tank trap terrain which suffers a mine attack should be removed from the board (or treated as nonexistent). Vehicles suffer a S7 penetrating attack.
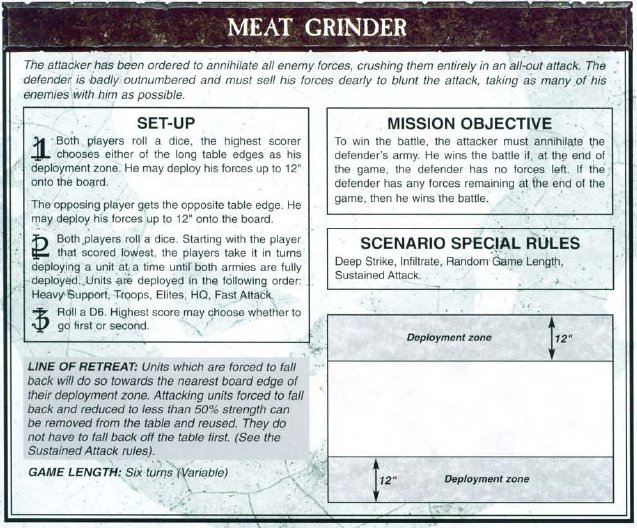
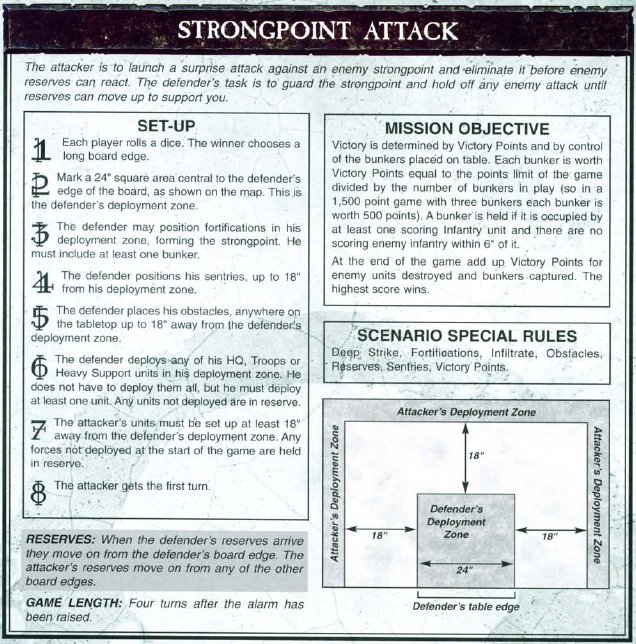
Mission 200502-009b: Intercepted
- Game Type: Ambush
- Participants: Chaos Marines, Necrons
- Scenario Special Rules: Hidden Set-up, Divided Force, Random Game Length, Reserves, Victory Points
- Points:
- Primary: 1,700
- Secondary: 1,700
- Game Length: 6 Turns/Variable.
- Winner: Victory Points
- Rewards: If the Secondary (defender) wins, they receive Rallying Victory, if the Primary wins, they receive Misdirection.
- Terrain:
The primary player has thwarted a plan to sabotage their base and in doing so has learned of a coming assault on their fortification. They launch an immediate counter-attack to attempt to ambush the first wave of the advancing forces and cut their opponent's momentum before it begins.
Chapter 10: The Smoke Begins to Clear
Mission 200502-010a: Something Wicked This Way Comes
- Game Type: Strongpoint Attack
- Scenario Special Rules: Fortifications, Infiltrate, Reserves, Sentries, Victory Points
- Points:
- Chaos Marines: 2,000
- Space Marines: 2,000
- Game Length: 4 Turns after the alarm has been raised.
- Winner: Objective/Victory Points (see pg. 207)
- Rewards: If the Chaos Marines win, they also receive Rallying Victory, if the Space Marines win, they receive Recoil Suppressors or Base of Operations (winning player's choice).
- Terrain: This board should be 4' x 9' (3 2x3 boards long, two wide). Must include the Space Marine's Base Board with the base area located along the long board edge in the center.
Using the orbital scans, the Chaos Marines decide to mount a massive offensive against the Space Marine encampment using stealth as their ally before they focus on their central objective on Triste.
Mission 200502-010b: Hell Beckons the Heretics
- Game Type: Bunker Assault
- Scenario Special Rules: Deep Strike, Fortifications, Infiltrate, Preliminary Bombardment, Reserves, Victory Points
- Points:
- Chaos Marines: 2,000
- Space Marines: 2,000
- Game Length: 4 Turns after the alarm has been raised.
- Winner: Objective/Victory Points (see pg. 207)
- Rewards: Every scoring unit occupying an uncontested bunker at the end of the battle receives an additional +100 Experience Points. If the Space Marines win, they receive Rallying Victory, if the Chaos Marines win, they receive Misdirection.
- Terrain: This board should be 4' x 9' (3 2x3 boards long, two wide). Must include the Chaos Marine's Base Board with the base area located along the long board edge in the center.
Using the orbital scans, the Space Marines decide to mount a massive offensive against the Chaos base. Note that at least 50% of the Chaos forces must be deployed within the confines of the base.
Chapter 11: Hated Friends
Mission 200502-011a: I Have Seen the Face of Death
- Game Type: Recon/Breakout
- Scenario Special Rules: Deep Strike, Infiltrate, Dusk and Dawn, Random Game Length, Reserves (Necrons only/Breakout Phase only), Victory Points
- Points:
- Necrons: 750/1,000 Reserves (Breakout Phase only)
- Space Marines: 750
- Game Length: Variable; 6 Turns/Variable.
- Winner: Victory Points
- Rewards: Every scoring unit occupying the opponent's deployment zone at the end of the Recon phase receives an additional +75 Experience Points. Each Space Marines unit that successfully leaves the battle via a qualifying table edge gains an addition +150 XP.
As the smoke and dust settle from the intense skirmishing to try and drive each other from the planet, the Space Marines send a small patrol to scout the extent of the damage to the Necrons. They meet a like-sized Necron patrol they assume is trying to scout them as well, but after some struggle they may find a nasty surprise...
This mission starts as a Recon, with both sides attempting to land scoring units in the other's deployment zone. If the Space Marines get at least one scoring unit into the Necron's zone, the Necron player rolls 1D6-1 to determine how many more turns it will take to spring their trap. Begin the countdown with the result of the roll (or immediately if the roll was 1), and after the Recon Turns are over; use the current location of all units as deployment for Breakout.
The Necron's patrol was a carefully disguised ruse to flank the Space Marines' rear and squeeze them when their sizeable reinforcements arrive. The Space Marines will realize this plot almost too late and must simply try to escape and survive. All Necron units that did not make it to the scoring zone must be removed from the table. Space Marine units that did not make it to the scoring zone and are Falling Back must make one last Leadership test (with all modifiers for losses plus an additional -1). SM units which fail this Leadership test are considered to be caught trying to flee the battle and destroyed (treat this as a Sweeping Advance destruction by the nearest Necron unit for purposes of Experience, Recovery and Victory Points).
Each Necron reserve unit will arrive beginning on the first Turn of the Breakout Phase with a Reserve check of 5+. Subsequent Turns are treated as normal. Necron reserves enter from their own Recon Phase deployment zone.
The Space Marines' mission once the Breakout Phase begins is to escape the battlefield. To prevent the Space Marine player from rushing to the corners during the Recon Phase, all Space Marine units may only complete the exit maneuver by crossing into a different table quarter before using a table edge. For example, a scoring unit in the Necrons deployment zone may backtrack toward the center of the table and the nearest short table edge. Once the unit has crossed the halfway mark it may make an immediate turn and flee the table. A Space Marines unit located near the center of the table need only cross into the nearest adjacent quarter (any quarter will do) and rush to the closest table edge. Note that Space Marines may not flee the table on the Necron's deployment edge, as that is where the massive advancing force of Necron reinforcements is coming from. All other table edges are valid.
Mission 200502-011b: The Skeletal Grasp
- Game Type: Meat Grinder
- Scenario Special Rules: Deep Strike, Infiltrate, Dusk and Dawn, Random Game Length, Sustained Attack
- Points:
- Necrons: 1,100
- Chaos Marines: 800
- Game Length: 6 Turns/Variable.
- Winner: Objective
- Rewards: Any surviving scoring units on the Chaos Marines force will receive +150 Experience Points. Any Chaos units surviving at all receive +25 XP.
As the smoke and dust settle from the intense skirmishing to try and drive each other from the planet, Artanius Gnoll's Chaos forces try to rest a lick their wounds when suddenly wave after wave of Necrons begin pouring out of a nearby wood. The Chaos Marines must hang on until their transports arrive to pull them back...
Mission 200502-011c: The Unthinkable Option
- Game Type: Take and Hold
- Scenario Special Rules: Deep Strike, Infiltrate, Dusk and Dawn, Random Game Length, Victory Points
- Points:
- Space Marines: 900
- Chaos Marines: 900
- Force Organization: Both army commanders must be included in the lists. If they are not available due to Recovery Rules, they may be used anyway but their points costs are doubled.
- Game Length: 5 Turns/Variable.
- Winner: Objective/Victory Points
- Rewards: Any army which has its commander into scoring position at the end of the battle will receive Negotiations. Units in scoring position receive an additional +50 Experience Points.
Unnerved by the recent horrors inflicted by the Necrons strengthening forces, Artanius Gnoll and $SPACEMARINES_COMMANDER agree to meet to discuss the problem. As both generals approach the meet location, an explosion goes off, igniting a skirmish. In a grim act of mutual desperation, both commanders fight their way to the meeting point to discuss a nearly unheard of truce...
Chapter 12: The Future's Black Horizon
Mission 200502-012a: Now I Lay Me Down to Sleep...
- Game Type: Blitz
- Scenario Special Rules: Deep Strike, Fortifications, Hidden Set-Up, Random Game Length, Obstacles, Preliminary Bombardment, Reserves, Victory Points
- Points:
- Chaos Marines: 1,000 (Attacker)
- Space Marines: 1,000 (Attacker)
- Necrons: 2,500 (Defender)
- Game Length: 6 Turns/Variable.
- Winner: Objective (Necrons must avoid Phase Out)/Victory Points. If the Necrons win, the next mission is A Difficult Retreat. If the allied Space Marines win, the next mission is The Icy Cascade of Realization.
- Rewards: Each unit in the Second Line at the end of the Mission receives an additional +100 Experience Points.
An unprecedented alliance has been forged between the Space Marines and their heretical ex-brethren. Determined to rid Triste of the Necron menace so they can get back to fighting each other in peace, the Chaos and Space Marine forces have agreed to try and punch through the massing Necron graveyard near Triste's central continent's Eastern seaboard. Once a unit has crossed into the Second Line, it will spend the remainder of the game fighting to stay there, even against its "ally." Chaos and Space Marines may not target, charge or otherwise impede each other's progress during their turn unless the units firing/assaulting and being targeted are both completely in the Second Line area.
Mission 200502-012b: The Icy Cascade of Realization
- Game Type: Hold at All Costs
- Scenario Special Rules: Deep Strike, Infiltrate, Random Game Length, Remainders, Random Reserves 4@230
- Points:
- Chaos Marines: Special
- Space Marines: Special
- Game Length: 5 Turns/Variable.
- Winner: Objective
- Rewards: Each Random Reserve unit which reaches the table gains an additional +D6x10 XP. Closest scoring unit to the objective receives an additional +150 XP.
As the Necrons phase out and the once bitter enemies now turned reluctant allies peer across the battlefield at each other, $SPACEMARINES_COMMANDER suddenly receives a call on his comm. The operator from the orbiting Space Marines warship informs him that the ancient texts from the Adeptus have finally been received and translated. The sacred documents describe a planet whose location is remarkably similar to Triste which supposedly housed a great underground factory the Eldar refer to in a few of their ancient texts. The translated name of the factory/planet from the Eldar tongue into Imperial common is "Manufactured Doom."
Suddenly understanding what Gnoll Artanius wants with Triste, $SPACEMARINES_COMMANDER flies into a rage and orders his remaining troops to close in and decimate the Chaos Marines.
Mission 200502-012c: A Difficult Retreat
- Game Type: Rearguard
- Scenario Special Rules: Deep Strike, Infiltrate, Random Game Length, Hidden Set-Up, Obstacles, Remainders, Third Parties, Random Reserves 3@300
- Reserves: Defender reserves arrive via Deep Strike rules and must target the center of the table initially. Attacker reserves move on from his board edge.
- Points:
- Chaos Marines: Special (Attacker)
- Space Marines: Special (Defender)
- Game Length: 5 Turns/Variable.
- Winner: Objective: Modification, Draws are not possible. Continue playing Turns until a victory condition is met.
As wave after wave of Necron forces decimate the allied Space Marines, the remaining Marines make a retreat. But during the fallback Artanius' Unhallowed Horde suddenly turns on the Imperial Sharks Space Marines. Desperate to escape, the Space Marines must hold off the Chaos forces while praying to the Emperor that they've managed to elude the Necrons as well. Just as things seem like they couldn't get worse, $SPACEMARINES_COMMANDER receives a report that his communications team has intercepted a transmission to Artanius where a Chaos patrol team says they have located an entrance to what they call "The Factory." Artanius' motives begin to make themselves clear, but for now the Space Marines need to escape so they can regroup and focus on stopping Artanius from achieving his goals.
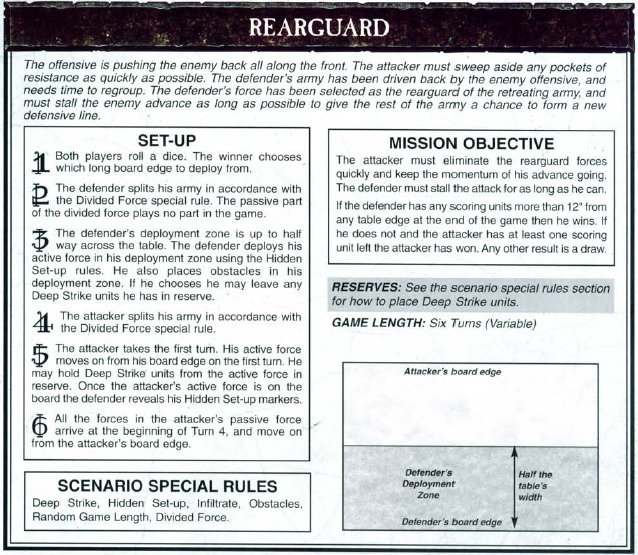
Chapter 13: Sanguine Search
Mission 200502-013a: What's This We're Looking For?
Note: Before this mission, each player rolls for Strategy Rating. The winner may choose whether to play this mission or to instead play Mission 200502-013b: A Faster Gun as the Kill Team.
- Game Type: Secure and Control
- Scenario Special Rules: Reserves, Flammable Terrain, Third Parties
- Reserves: Reserves move on from the player's board edge.
- Points:
- Chaos Marines: 750
- Space Marines: 750
- Game Length: 6 Turns.
- Winner: Objective. Variant: Start with 8 Loot Counters, numbered and randomized. Take turns placing them face down on the table as listed in the normal mission card. Before the game begins, roll 1D8 to determine the correct location. When any unit is moved within 6" of a counter, the unit's player may peek at the counter once. The player who controls the correct location at the end of the Mission wins. The winner is Primary for Mission 200502-013c: The Battle of Factory Foyer.
- Rewards: Scoring units at the end of the game earn an additional +75 Experience Points. Any units within 6" of the correct location at the end of the Mission earn +275 XP.
It has become clear that the Unhallowed Horde are searching for an entrance to an ancient underground facility. They have narrowed their search down to a small patch of land in a heavily forested area. But the Horde does not realize that the Imperial Sharks Space Marines are privy to their schemes and meet them onsite. A mad dash to find the entrance to the Factory ensues.
Mission 200502-013b: A Faster Gun (Kill Team)
This mission is only played if the Strategy Rating winner from What's This We're Looking For? chose to play the mission in a Kill Team scenario instead.
- Game Type: Kill Team Locate (Custom)/Escape
- Participants: Chaos Marines, Space Marines
- Winner: Before deployment, take turns placing 6 numbered, randomized counters around the game board. There must be at least one counter in each table quarter and counters may not be closer than 10" to each other or any table edge. The Kill Team's objective is to move at least one model within 3" of all six markers. The Kill Team must also report their findings to headquarters so once the Locate objective has been completed, immediately play Escape starting from the exact position (exit table edge will be determined by the location of the final counter). All Klaxon counters from the Locate portion remain at the beginning of the Escape portion. If at least one Kill Team model escapes, the Kill Team succeeds and are Primary for Mission 200502-013c: The Battle of Factory Foyer. Otherwise, the Brute Squad player is Primary in that mission.
It has become clear that the Unhallowed Horde are searching for an entrance to an ancient underground facility. They have narrowed their search down to a small patch of land in a heavily forested area. The Kill Team army has decided that the best way to locate the entrance is by sending a small, stealthy squad in to quietly search the surrounding area. Unfortunately the Brute army beat them on site and has already set up a perimeter, confident that by securing the area they can search at their leisure. Stealth is of the essence as the Brute forces must be avoided and someone has to make it back to base to tell headquarters where the entrance actually is...
Mission 200502-013c: The Battle of Factory Foyer
- Game Type: Take and Hold
- Scenario Special Rules: Concealment, Flammable Terrain, Third Parties, Dusk and Dawn, Random Game Length, Infiltrate, Deep Strike, Objective Phase Out, Victory Points
- Points:
- Primary: 1,100
- Necrons: 1,100
- Game Length: 6 Turns/Variable.
- Winner: Victory Points.
- Rewards: Scoring units receive an addition +100 XP.
After locating the entrance to the Factory, the Primary army waits for a sufficient company of men to arrive to secure the underground facility and whatever vile machinations it may hold. Just as the security forces arrive, a wave of Necrons phase in, intent on preventing anyone from entering the Factory.